Uggy
Line

Build Your Own Character

Line

Written by Jeff Walters

I would like to thank Pax for setting me off into the 3DO editing world and Alexei Novikov for creating a great program in Conman

Alright. Want to make your own 3DO character (like my own creation - Uggy - see pic above), but don't want to wait until an editor gets here? Well, read on! First, you need to do two things - A) Create a directory called '3do' in you Jedi Knight directory & B) Download a program called Conman - it's on the WDFUSE homepage in the Download section. When you get the zip file - just extract all the files into your JK directory.

Okay....next.

Load up Conman and click on 'Open Container' in the file menu. Go to the 'resource' directory and click on res2.gob. Once it's loaded, go to the folder labelled '3do'. One you click on '3do', you'll see a whole hell of a lot of 3do files listed. For this tutorial, all you'll need is two files - ky.3do and io.3do. Extract both files into your newly created '3do' directory.

MESHES
A 3do is divided up into parts called meshes. A mesh represents a particular section of the 3do, e.g - head, left arm.

Next.....open both ky.3do and io.3do into text editors (eg. WordPad). At the top of both files is something called a material list. This assigns certain textures (.mat files) to certain numbers......remember this as you'll be modifying this list later on. These numbers are referred to later on in the file to texture the faces of the 3do. Now, editing 3dos is extremely easy once you know what goes where. As a quick demostration - this tutorial will show you how to take the head of an Imperial Officer (from io.3do) and stick it on to the model of Kyle Katarn (ky.3do).

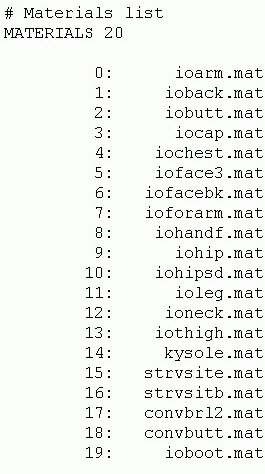
The Materials List - this is where all the textures used in a 3DO are assigned reference numbers

Now - scroll down io.3do in the text editor until you hit Mesh 1...called 'k_head'. Copy everything from 'NAME k_head' down to just before the next mesh (Mesh 2). Then go to ky.3do and scroll down until you find Mesh 5, which will also be called 'k_head'. Paste the information you copied from io.3do over the part in ky.3do from 'NAME k_head' down to just before the next mesh (Mesh 6). Good.....now your Kyle 3do model will have a head the shape of an Imperial officer!! But you're not finished - you have to fix up the textures first.

What you need to do now is to change the textures (.mat files) named at the top of the file for Kyles head...to the textures for the Imperial Officer's head. There are three textures that have to be transferred....namely textures 3, 5 and 6 from the material list in io.3do (iocap.mat, ioface3.mat, iofacebk.mat respectively). Okay, now you know the mat files you need to add to the materials list at the top of the ky.3do file

Here is what you need to do to correctly modify the materials list in ky.3do - paste iocap.mat over kyfacetp.mat...paste ioface3.mat over kyface3.mat...and finally - paste iofacebk.mat over kyfaceb.mat. There......almost done. The thing you have to consider now is that while the textures for Imperial Officers face now replace the textures for Kyle's face, the numbers assigned to the .mat files are now different (remember before they were 3, 5 and 6 on the materials list in io.3do? Now they are 3, 0 and 1 respectively). This means that you will have to modify the part in the head mesh that points to the textures to account for these number changes.

Materials Column - this is where textures are assigned to the faces of a mesh by their reference number.

Don't worry, this will be very easy. Simply scroll down ky.3do to the head mesh (the one you modified earlier - Mesh 7) and go to the part starting with - 'FACES 26'. Below this you'll see a table, containing a column called 'materials'. This is where the 3do assigns certain textures to the various faces of the mesh. You are going to have to modify the numbers in this column to account for the number changes. In this example, iocap.mat has been assigned the same number (3) in both ky.3do and io.3do - so therefore you don't need to change that number in the 'materials' column of the mesh. But the other two will have to be changed. Okay, now simply scroll down the materials column and every time you see a 5 replace it with a 0, and every time you see a 6 replace it with a 1. Remember - ignore the 3's, they are fine as is.

Guess what? You're done!! The last thing left to do is to check out your new 3do. Load up Jedi Knight and go to the Multiplayer Character selection screen. The model called 'Katarn' will now have an Imperial Officer's head :-) I know this is pretty ugly looking, but the point of this tutorial is just to show you the basics of editing 3dos. With what I've shown you above, you can really create thousands of different looking 3dos.

To test your new ugly Kyle/Imperial Officer hybrid in gameplay - just play JK as normal. One thing though - I wouldn't recommend loading up saved games to test your 3do with. There seems to be a bug in JK that often makes things look all screwy if you use a custom 3do in saved games. Don't worry, it won't cause any damage - but it does look wierd.

Have fun creating your own single player and multiplayer characters!!!