There are three different ways to do lighting in Jedi Knight: lights as objects themselves in light mode, extra lighting by sector or surface, and dynamic (or thing) lights. A level will benifit if you use each in its proper place.
This is a basic lighting tutorial explaining how to use basic techniques in all three ways. I may make a more detailed tutorial for those "experts."
Extra lighting is simply adding more or less gamma correction to a certain surface or sector. For example, in JK, when you adjust Gamma with the F11 key, you are adjusting gamma globally, across the whole level. Extra lighting is adjusting it sector by sector or surface by surface. The downside to this is that no shadows are generated; which is only logical, you aren't making light 'come' from anywhere, simply adjusting the brightness of textures.
The highest amount of extra light possible is 1, fully lit, and lowest is 0, nothing. Play around and experiment with it! Extra lighting is good if your level won't have many light contrasts or just to have light dark rooms. That won't make for a good level though-- in addition doing lighting that way is a serious pain.
A good use for extra lighting is to make sure you can see. If you have a totally dark sector with one light in the corner you could add .25 or so extra light for visibility.
Before releasing your level, you should make a run through and look for those surfaces that are completely black. Set them to .25, .30, .35, or other applicable setting. This is the best use of extra light IMHO; as a way of correcting mistakes made with the other type of lighting.
This section of the tutorial has a little more to it, since doing lights in light mode is far more complicated than simple gamma adjustment.
After inserting a light, you will see in the item editor box two variable settings: Intensity and range. Intensity is how bright (or dark, but we'll get to that later) your light is. Expert disagree on what the highest value is, as 100 seems to make a different effect than 10, but not much. We'll assume that 10 is the highest in this article, and the lowest is -10. These values obviously make the light brighter or darker, however, you'll get less shading the lower the intensity. The range is how many vertices will catch the light. Let me drop into technical mode here, and explain what vertice (or vertex, the terms are synonymous) lighting is.
Light actually comes from the vertices, not the light. This is because JK calculates that the lighting _before_ entering the level. In Quake and it's spawn, lights are dynamic entities, able to be moved around, and look like they are moved around. Think of a lantern here, swinging and its light following it. These type of lights are called 'point lights' or 'dynamic lights'. There is a difference between the two, but in JK it is irrelevant.
Now, the way JK calculates lighting is like if there's a light on the ceiling, but it can't shine from there -- it must be calculated as light from the nearest vertices. (Roughly analogous to the corners of a room.) The upside to this unrealistic technique? Speed. It takes FAR less math to make a light that works this way than to make alight that works like in Quake & spawn. You get a better framerate. (One reason you can run JK at 1280x1024 hardware at 60 fps, as opposed to, say, Shogo.)
JK throws a twist on this because it does include point lighting -- after a fashion. It is buggy, it is convoluted -- but it allows awesome effects. When you turn on your field light in JK, you are making yourself into a point light. The saber is another example of a point light. For the technical minded, dynamic light is generated and controlled though the COG verbs GetThingLight(), SetThingLight(), GetThingCurLightMode(), and SetThingCurLightMode() . In addition, the template property light= sets the amount of light initially displayed. (That's the core of the light1 thing.)
Anyway, back to the practical application of all this, JED. The number you put in range is the radius of a light "bubble." (I'll make up my own terms, thank you) Any vertices inside this "bubble" will emit the light, but to differing degrees depending on the distance from the source. If you make the range smaller than your sector, the light will eventually fade out. It's hard to get the range number exact, so you'll have to play with it. A lot.
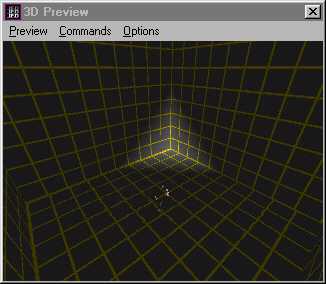
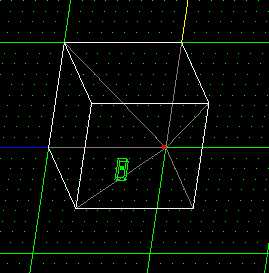
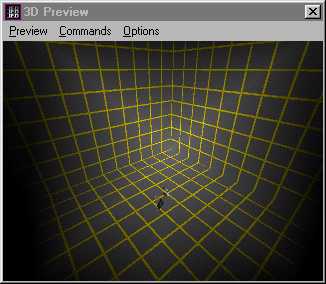
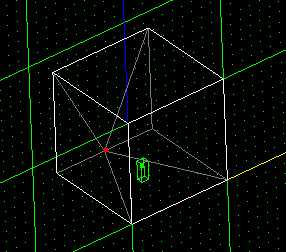
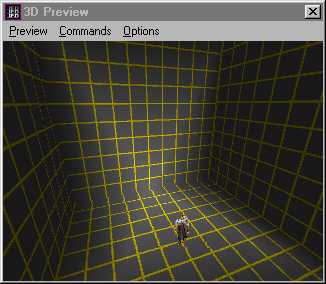
Here are a few tricks you can use to get lighting effects. I'll show you in a square sector. Put the light near a corner and set the range to 0.1 and calculate lighting, then veiw it with the 3d previewer. You don't have to worry about the intensity right now.
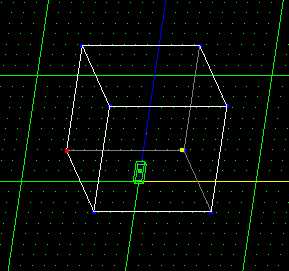
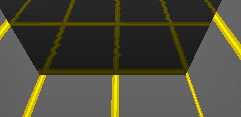
This is a little uncontrolled, and is perfectly fine if that's what you're trying to get, but there is a way to control the lights path by using edges. Light tends to follow or stop at edges. The next two pictures show a technique to control lighting. By cleaving edges going from the vertice where the light is situated you "guide" the light along its path.
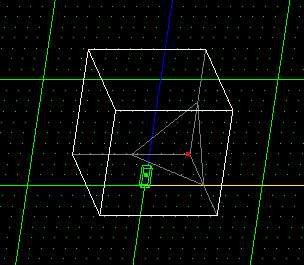
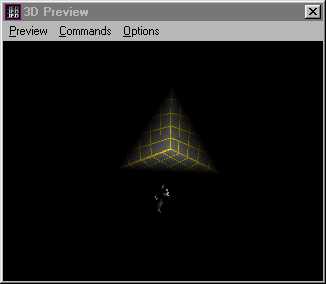
Another technique is to cleave around the vertex where the light is situated. This fades out the light at the edges.
What you'll get is a dark room with a lit corner. This is a situation where extra light would come in handy.
The basic rule is that when an edge extends from the lit vertex the light will follow it, and if an edge is outside range of the light, then the light will fade out at the edge. Try it out for yourself for a better understanding. Words are failing me here.
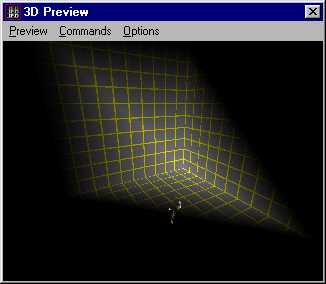
These methods aren't the only way to do it. You can mix them up or change them any way you want. Also, this is just a plain cube, try different shaped sectors. Here's an example:
And another example.


Learning lighting takes playing and experimenting. Try recreating my examples and making your own. Normal JK lighting is not all that bad, just counter-intuitive. You have to get used to the thought of vertices giving off light, rather then the light you place.
Dynamic lighting is JK is, as I said above, a risky process. First, an overview of how to place these lights into your level: Go to thing mode, and select any of the light* family. That's it.
Why use dynamic lights? Dynamic lights are, by definition, changeable. That's what dynamic means, after all! When you want a strobe effect, use a dynamic light. Flicker? Use a dynamic light. Any time that a light must change in your level, use a dynamic light! As noted above, you might have to write a cog to get the effect you want, but it is possible.
But dynamic lights are buggy. If you've ever played around with Quake mapping, you know about VIS/LIGHTS and how long they take! What they do is make it so that the dynamic lights of the levels won't shine through to other surfaces/brushes. Jedi Knight has no such system. If you have a dynamic light next to a wall, particularly if it is a strong dynamic light, chances are it will shine though. Not only that, it'll flicker bad enough to induce migraines. Not a Good Thing(tm).
Dynamic lights require more fussing around with than normal, vertice lights. Since you are unable to preview them in the JED 3D preview, you must boot up JK every time you want to test your lights.
These lights are best used sparingly. One here, as a flickering light. Another there, are a light than can be turned off. The list will go on. Most lighting, though, should be done with the Jedi Knight vertice lighting. Despite all its quirks, it can be previewed in JED, and isn't horridly buggy. Extra light should be used as a touch-up tool to dynamic and vertice lighting.
None of these are rules, of course, simply guidelines I've found helpful while editing. You might, too! Have fun editing...