Advanced Architecture Techniques
Author: Brian Lozier
There has been quite a bit of discussion lately on what's the best way to do certain things. This article will discuss how to do things, as well as why. This tutorial centers on, and uses screen shots from, JED. JkEdit doesn't really ever allow you to see all the individual sectors, nor does it allow you the control needed to do things like this, so it really doesn't apply.
First off, we will talk about perfect polygons. There are two tutorials on perfect polygons in the tutorials section. I suggest you use perfect polygons whenever you can. Most times, they allow your later cleaving to be more efficient, and they also allow you to create advanced architecture that is just not feasible otherwise. Really, the only time you do not want to use perfect polygons is with outdoor architecture!
The first example of this is the following pipe junction. This pipe junction uses very few sectors for its complexity, and is relatively easy to create. I challenge anyone who doesn't use perfect polygons to try to mimic this in a reasonable amount of time.
![[Final Result]](final.gif)
If you take a look at the selected sector, you will see the shape of each and every polygon. They are all shaped the same, with the point at the end. This point allows all the ends to line up perfectly. The first step in the process is to get all the horizontal pipes completed and adjoined. First off, use the perfect polygons tutorial and create a pipe that has 8 sides and is 1 grid square wide. If you already know how to create perfect polygons, and don't want to mess with making some more, feel free to download the following JED file. It includes a wide selection of perfect polygons, merged and otherwise. Please use one of the merged ones for this exercise.
Download Perfect Polygons Prefab
Now is a good time to discuss the impact of the number of sides. 8 is a pretty good number because it's fairly simple, yet still looks relatively round. I will demonstrate later in the tutorial the impact of jumping from an 8-sided polygon to a 12-sided polygon in complex areas. Experiment around to see which works best for you. Suffice it to say that the more sides the polygon has, the more time it will take to make, and the bigger the impact on framerate will be.
One thing that is very important in the creation of advanced architecture is the use of the [F9] tools dialog. This allows you to rotate and scale sectors or groups of sectors, among other things. The ability to rotate and scale sectors gives editors an incredible amount of flexibility. You can create pipes and corridors that shrink, grow, twist and turn with relative ease.
On to the rest of the article. The first thing you need to do is arrange four of your pipe sectors so that they overlap exactly one grid square. To do this, you will need to copy [ctrl-C] and paste [ctrl-v] your original pipe sector. Once you do that, you will need to line it up vertically and horizontally. If you do not know how to do this, please refer to the basic editing section as well as the simpler tutorials on our tutorials page. You should use the [F9] tools menu to rotate your sectors around the Z axis. Please, save a copy of your starting sector for later use (it will make things a lot easier).
There's a lot of information I have to throw out there before we can actually get into this (when outlining the article, this kind of stuff didn't occur to me). I am a big fan of cleaving things the most efficient way possible. This allows you to create large complex areas with great framerate -- even on lower-end machines. Sometimes, however, there is just no way to cleave things and have optimized sectors. This is where merging comes in. There are times when you MUST cleave something into pieces, and then merge it back, to get the best, most optimized set of sectors.
The perfect polygons tutorial is a perfect example. Sure, you could leave your pipes carved into pie-shaped pieces if you really wanted to. However, this creates un-wanted and un-needed sectors. These extra sectors bring down framerate, up the file size, and make it a nuisance when adjoining/cleaving later on.
Now, you should arrange your sectors as follows. Here they are shown from the top, side and front views so you can get a better idea of how it should look. Basically, you start with one sector, insert it again, overlapping by exactly the width. Then, you copy it again, use the [F9] tool to rotate it around the Z axis 90°, overlap it, and do the same one more time.
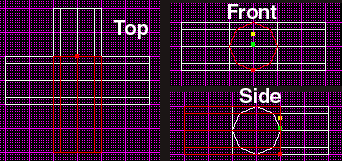
It is important that you get these lined up perfectly. If they aren't, you'll spend a lot of time following the rest of the tutorial, only to find that your sectors won't adjoin at the end. The best thing to do is to use JED's grid snap [Shift+s] to align to one vertex, then use that vertex for all subsequent alignment. It's best to use one of the side vertices, as shown below (highlighted in red).
When you are done with these four sectors, they will all be cleaved and adjoined such that they make up the horizontal layer of pipes. The first thing you have to do is multi-select all the sectors. There are two ways of doing this. First, select a sector, press the spacebar, then click on another sector. This should change the color blue, and the sector will be multi-selected. Do this will all four sectors. Alternately, you can hold down the [alt] key and drag a box around all the sectors. For future reference, you can un-multi-select all the sectors using the [Backspace] key.
Once they are selected, switch to the top view and cleave diagonally across the overlapping sectors, as shown below. You must get this exactly correct or it won't work. I always use JED's snap-to vertex option. I've dragged the extra pieces (the ones you just cleaved off) to the side to show exactly what you should have (they are shown in blue). In your case, however, these extra sectors should be deleted (I only kept them for demonstration purposes).
![[Cleave like this]](2.gif)
Once those sectors are deleted, multi-select the whole mess once again, and cleave diagonally opposite of the way your originally cleaved. This will create an "X" of sorts. I have once again dragged the extra sectors off to the side, but you should delete them.
![[Delete the extra sectors]](3.gif)
Your project should look like the picture above. If you go into 3D preview, you will be able to select and adjoin the pipes -- they should line up perfectly (these last steps can actually be accomplished with non-perfect polygons, however, the next few steps cannot be).
Now, select your starting sector (you saved it right?), copy it, and paste it in again. This should be done twice so you have two new sectors. Rotate these 90 degrees around the Y axis this time. If you switch to side view, you should see them perpendicular to the rest of your sectors. Line them up so that they overlap each other, and the other horizontal sectors, exactly. Please refer to the screenshot below. Remember, keep snapping the grid to the same vertices you used before, or they won't line up correctly.
![[Overlap exactly or you'll get an error]](4.gif)
Now it's time for the tough stuff to begin. Basically, we are going to select a few sectors, and cleave them so they make a point (just like the very first picture in this tutorial). In order to get this to work right, you must select the correct sectors. Below is a screenshot of which sectors you have to select.
![[Multi-Select these sectors]](correct.gif)
It's very difficult to explain exactly which sectors to select. If you're at the [Shift+2] view, select all the sectors that aren't facing directly at you.
Now it's time to do the X cleave once again. Remember, this is only cleaving 4 of your six sectors. You don't want to cleave them all because you'll chop up two of your polygons length-wise (and you don't want that!). So, cleave diagonally across just like we did in the top examples, and delete all the extra sectors. You should end up with 6 sectors still, so if you have more, hunt for the ones you didn't delete.
Now you have to do the other side view [Shift+3]. Select the correct sectors (just like above, except not the ones facing you -- you'll have the two sectors facing up and down, and then the sectors facing left and right, not the ones facing directly at you). Then, cleave them diagonally as well. Remember not to align your grid to anything that will mess up the alignment. Working with such complex cleaves, little movements of the grid can mess up the whole project.
Then delete your extra sectors. Below is a screenshot within the 3d preview after I've deleted the extra sectors. Notice the spikes coming up out of the floor and down from the ceiling. You can select these and adjoin them to make a perfect pipe junction. (the spikes are textured for ease of viewing).
![[Spikes]](spikes.gif)
Now, go to 3D preview and adjoin all the sectors -- this will complete your pipe junction. Below is a picture of right after the bottom half was adjoined, and then with it all adjoined.
![[End Result]](finally.gif)
Thanks to Farrax for the additions/changes to the original tutorial.