Note: This is an old page that has been updated/formatted, you can view the original here.
Animation Made Easy!!!!
Allright Jedi Knightnicks! I've always wanted to create new player animations and animations for new enemies, but the task is has been so daunting {daunting (daun' ting) adj, def: scary} with the current version of Trajedi; the only utility that can do keyframes for Jedi Knight and MotS. But kids, it's easy. Jed (that marvelous and loveable little program) does half of the work for you. I'll show you what I mean!
You will need:
- Jed beta .91 (any version that has the Quick and Dirty Template Maker is cool)
- Trajedi (for obvious reasons)
- An ungobbing utility (Conman, JKGob,etc.)
- Puppetjedi (kind of as a conveinence)
- A firm grip on your sanity
Ok! First pop open your ungobbing utility and extract Ky.3do and save
it to a new file folder.
Crank up Jed and Import Ky.3do.
Now comes the fun part!
Select a mesh (part of Kyle's body) and press enter Select a mesh (part of Kyle's body) and press enter (click the check box that keeps the Item Editor on top to keep it on top). Look under the Item Editor and find the mesh's Layer name. Export the mesh as a 3do. Save that 3do to the directory you saved Ky.3do with the Layer name as the name of the 3do.
Do the same thing to all the other body parts. You can delete the parts you've already exported to keep track.
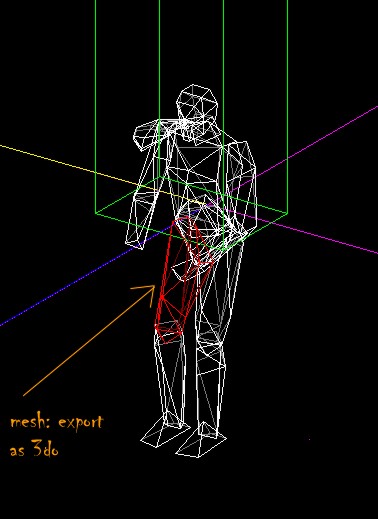
You'll find that as you're exporting that Kyle has no Right Hand. Cycle through the meshes with N or P and watch the Layer names for K_Rhand. When you find that Export it too.
Now! Once you've exported all meshes, start a new Jed Project. Save it as whatever you like under the same directory that we've been saving things in.
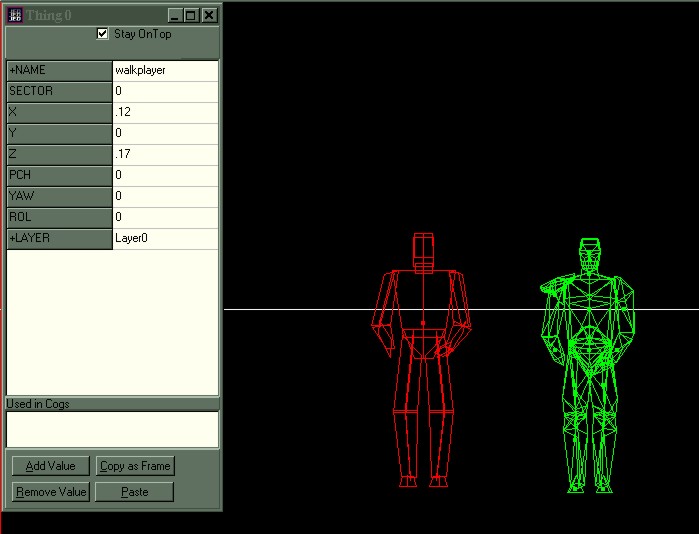
Go to Thing mode and insert a new thing (Don't get rid of the Walkplayer)
Now go to your Tools and select the Template Maker.
Push the 3do button and select one of the 3do meshes that you exported.
(i.e. K_Torso)
Repeat this process until you've made a template for each of Kyle's
parts.
Now insert a whole buncha things and change them into the parts of Kyles bod.
Now we get to play Frankenstien!!!!!
Now we gotta put Kyle together. Mash the F4 button and change the "snap to" setting to .005. Now select K_Torso and go to the Item Editor and put the number zero in for the entries: X Y Z Pitch Yaw and Roll. This will set the torso at absolute zero. Drag all of the body parts to the torso.
Using the Walkplayer as a reference put Kyle in order. It doesn't have to be perfect. (It won't be) It helps if you set things as Wireframes. (View- View thigs as- Wireframes)
About placeing the right hand: The small dot that is the right hand is very important. It tells the game where to put the gun or saber or fist that Kyle is using. Put it somwhere near the end of Kyle's Right Arm.
Now we have a working model of Kyle! "So what" you may ask? Open Trajedi now.
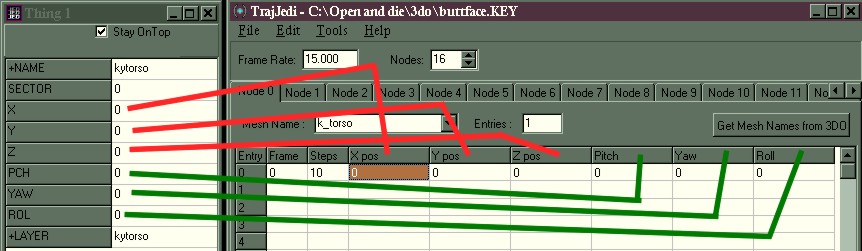
You'll notice that the entries in the Items Editor correspond to the entries in Trajedi!
Press "Get Mesh Names from 3do" and select the Ky.3do from you project directory. This will set you up with all the mesh names. Click the Nodes entry up to 16. (Kyle has 16 body parts) And name each of them a different name from the drop down menu, "Mesh Name".
Now comes the long and tedious part, entering the coordinates for each part of Kyle. Simply select a part in Jed and get the XYZ PYR entries from the item editor and type them into Trajedi.
Part 2
Now that the setup is all completed It's time to animate!! Unfortunatly I can't help you with this part, because this part is up to you. I've given you the means, now the world is your oyster. (so to speak) I can give you some pointers tho.
-If you've ever seen Claymation in production, you know that the modellers move the figure a little then take a picture. move it a little and take a picture, move it a little and take a picture (Juxtaposition, great art school word!). Essentially that is what Character Keys are about, except that instead of taking a picture you're copying the coordinates into Trajedi. In Jed flip your view around using Hotkeys 1, 2, and 3. (pressing shift at the same time flips the grid to your view, which is helpfull.) In different views you can move the different parts to different locations.
-Stand in front of a mirror and perform the action that you want Kyle (or other) to do. This will give you a good perspective of what the move will look like, which in turn will make the move look more realistic. (If you want Kyle to do a double somersault in midair and finish with a flying kick, you can forget about doing that in front of a mirror).
-When doing upper body moitions the legs don't move much. Right cick copy and paste leg entries to save time.
-When doing complex arm movements telling the Right Hand which Pitch Yaw and Roll what they will be might become sort of a challenge. You may use a gun mesh such as bryg.3do in place of the right hand in order to sort this out.
-Use Puppet Jedi and Trajedi side by side to study keys already made by LEC. This will help you understand a little better, how they work.
-Increasing the number of steps in the "steps" collum in Trajedi makes animations like walks and idles more smooth and slow, that also cuts down on the number of entries that are in the Key. 10 steps is a good number to put in for those kind of animations. However quick animations like punches and saber swings use 1 in the steps collum and have less frames.
-In most keys (Except for Deaths) whatever part of Kyle that moved returns to the position that it started in at frame zero. Think your keys through. If a punch connects with a face, you're only halfway done. You can experiment on your own, but my own observations have shown that the meshes return to thier origional stations whether you want them or not. (For some odd reason a five frame key turned into a seven frame key).
-Use Puppet Jedi to check your work instead of using booting up Jedi Knight.
-This technique works with other multiple mesh 3do's as well. Less body parts, less work!
Well Kids, that's about it! Get out there and make Kyle pick his nose or something. I'd like to thank God real quick because He was the one who gave me this idea.