Note: This is an old page that has been updated/formatted, you can view the original here.
Creating MotS Style Cutscenes
by Jay "Jarrod Li" Leno
This tutorial requires the following files:
tutorial.zip - tutorial.cog (below) and jabba.wav (1.05
megs)
tutorial.cog - download this if you don't want to wait
for the wav file to download. You will then have to create your own
jabba.wav file.
First off I would like to thank Alexei Novikov for such a great program and Antony Espindola for his cutscenes tutorial, without which, this could not have been written. Please read his original tutorial, I have taken the intro out of it but all of it is informative and should be read before attempting this tutorial.
(His original words are noted.)
The programs that you will need, which you most likely already have, are:
- JED 0.x (0.8 is currently available!!!)
- Cogwriter (0.3 is currently available)
- Conman (0.7a is available and also optional)
All of which can be downloaded at: www.jediknight.net/darkjedi/
Antony: One of the best features of the Jedi Knight series of games is the fact that they contain "cutscenes" when you finish either a level or certain objectives. These are like mini-movies which help with the flow of the story being told by the game. The cutscenes in Jedi Knight were pre-recorded video which is then saved to the CD in a special format and then played back. With the Mysteries of the Sith add-on pack, the cutscenes changed from video to being "acted" out by the graphics engine of the game itself. These cutscenes were also recorded to the CD (as .san files) but were created using the game engine and COGs. "
I have seen many questions about creating MotS style Cutscenes on the Message Boards by so called "Newbies." I have had these same questions since MotS was released, and so, not two weeks ago I decided to dive headfirst into creating a cutscene of my own. First I would like to give credit where credit is due: Alexi Novikov for JED, Antony Espindola for his Cutscenes tutorial, and Dak aka Jason Burton for the cog that Antony modified which, in turn, I modified for this tutorial. Please read Antony's tutorial before starting this, it will give you a good idea of how to go about designing your particular cutscene, besides that, he put a lot of work into it and it is an enjoyable read. J
This tutorial is based on the premise that you have a rudimentary knowledge of how to move objects using frames. If you do not know how to do this please download and read the tutorial on elevators before continuing. It is also based on the premise that you have a basic knowledge of the Cog language. You do not need to know how to write a brand new Cog just yet. If you do not understand Cog, download the article "A Force of Your Own." Both of these are available at the Massassi Temple where you downloaded this file. There is also a file on your MotS CD called Cutscenes.zip. It is in the Gamedata/Resource/Video subdirectories. Unzipping it will give you lots of Cutscene Cogs to look at later.
Description
We are going to create a simple room with a console. The player will start in that room, walk up to the console, activate it (by pressing the space bar) and then the cutscene will begin. The cutscene will exit to an external view (like pressing F1), show a message that it has been activated, then the camera will rotate 360 degrees around the player, while playing a sound. Then it will play another sound just as it finishes the rotation and then return back to an internal view.
Step One
Open your copy of Cogwriter and JED. You do not need to open ConMan unless you want to look at some other cutscene cogs later.
Step Two
In your project directory create a subdirectory called Tutorial. In JED save the level as tutorial.JED in the Tutorial project directory. Place the Tutorial.cog and the Jabba.wav files that came with this level in your project directory as well. Now using the default sector size, texture the floor with some sand (mdm15fsand.mat) and the sky (4309sky01.mat). Next place an item (console5) just in front of Kyle. Adjust the heights of Kyle and the console as necessary so they are sitting just on top of the sand and not in it. Next we are going to be placing the camera's. The cameras are in the template directory. We will be using 9 camera's for this example. That may seem like a lot but it will give a somewhat smooth 360-degree rotation around Kyle.
Step Three
Now we are going to place the cameras in a counter clockwise position around Kyle. Four of the cameras will be at the cardinal points N,S,E,W. If your grid is set at 0.2 these cameras will be 4 "dots" away from the middle in each direction. Then next four cameras will be in-between the first four cameras at a X,Y coordinate of 3,3 (3 dots up and 3 dots over). Now on to the ninth camera. It will be placed just to the right of the North (#1) camera. However the cog doesn't like it to be in the exact same position so we will fool it and the viewers eye. Change your grid to 0.1 and the snap to 0.02. Now move that last camera over next to camera #1. You will have to zoom in to make sure that it is next to camera one but not in the same spot. I am going to spoil you and give you the necessary coordinates for each of the cameras.
| Camera | X | Y | Z | PCH | YAW |
|---|---|---|---|---|---|
| 1 | 0 | .8 | .55 | -.35 | 180 |
| 2 | -.6 | .6 | .55 | -.35 | 225 |
| 3 | -.8 | 0 | .55 | -.35 | 270 |
| 4 | -.6 | -.6 | .55 | -.35 | 315 |
| 5 | 0 | -.8 | .55 | -.35 | 0 |
| 6 | .6 | -.6 | .55 | -.35 | 45 |
| 7 | .8 | 0 | .55 | -.35 | 90 |
| 8 | .6 | .6 | .55 | -.35 | 135 |
| 9 | .2 | .8 | .55 | -.35 | 180 |
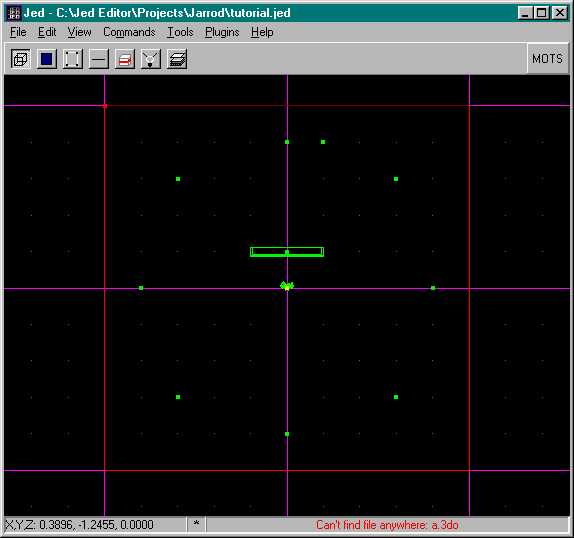
The view above is what you should see before you place camera #9 in it's correct spot. If you look at the 3D Preview window all of the cameras should be facing inward towards Kyle and downward at him as well.
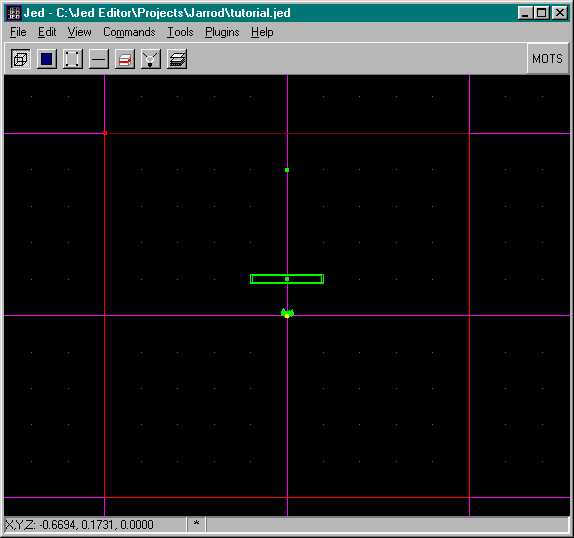 |
Next we will select Camera #1, and start adding values to it. The first value we need to add is NUMFRAMES and then we need to add 9 FRAME values. In the NUMFRAMES field goes, yep you guessed it, the number 9.Now select the first camera and hit the "Copy As Frame" button and paste the value into the first frame box. Continue this in a counter clockwise position until you are finished. Now delete all of the cameras except for Camera #1. Next change Camera #1 into a ghost. This is done by double clicking on the name and selecting "ghost" under the Template menu. Now save your level and open your copy of CogWriter. Your finished product should look just like the picture at left. |
Step Four
The next stage of our cutscene involves the Cog for our cutscene, so make sure that the file Tutorial.Cog is in your project directory. Go into JED and open the "Placed Cogs" menu and Add the Tutorial.cog you just put into your project directory. Select the Cog that you just added and it should ask you for the Cam(thing) number, the Console(thing) number and the Speed(flex) number. The speed should already be filled in so just fill in the camera and console thing numbers and save the level. Now hit F2 to save the JKL and GOB the level.
Now it is time to test out your newly made cutscene. When the level loads you will see a console in front of you. Walk up to it and press the spacebar. It should switch to an external view, print "This is your first cutscene" on the screen, play the .wav file Jabba, and circle around Kyle. Then it should play the .wav file kk60058.wav just as it switches back to the player view and prints "The End of your first Cutscene" on the screen. Then it will return Kyle to your control.
Finally
This has given you a sample cutscene that you can use to discover the ways of cameras, ghost objects, and the cogs that control the cutscenes. In Antony's tutorial he goes much more in depth into the cog. He also covers .pup files which make the player perform certain functions like crouching or dropping an item. So if you want to create a cog that's totally new, read his tutorial again and study the cog provided with this tutorial to discover what each of the functions does. Also look over some of the cogs that came on your MotS disc. Lastly enjoy your new skill, practice, practice, practice, experiment with the cog, it's the only way to really learn how to use it and give us lots of great SP levels with great Cutscenes, oh, and have fun too.J