JK2Radiant Beginners Tutorial
Author: Vincent Valentine
If you haven't already, download JK2 Radiant from the programs section. After you've downloaded it, open the file and run the executable file, JK2EditingTools.exe.
A dialog will come up, asking you where you want to extract the files to. This must be your gamedata folder. For example, on my computer, Jedi Outcast is installed in C:\Jedi Outcast. So I would type in C:\Jedi Outcast\GameData\

After the extractor is finished, open up the new Tools folder in the GameData directory. These are all the tools Raven has given us (so far) that we can use to edit Jedi Outcast.
Since this tutorial is only covering basic level editing, we won't deal with the other programs. Double click JK2Radiant.exe to load the map editor. It will take a while to load. Don't give up! The first time Radiant loads, it has to set several configurations; the loading time from then on will be much faster.
Grey on white is bad. It hurts after a while. Lets make it green. Go to Misc>Colors>Themes, and select Black and Green. Ah... my eyes feel better already.
Now, to make sure you have all the necessary views open, go to Edit, and select preferences. Make sure that the first icon view in the Views/Rendering box is selected.
Okay, lets make a room! Creating a brush is simple, you just drag the mouse. Along the top and left side of the main editing window, you'll see a bunch of numbers. These are the map coordinates. Left click and hold where the 128 (on the left side) and the -128 (on the top) intersect. Drag the mouse over to where -128 (left) and 128 (top) intersect, creating a red box.
*Note: That blue thing is the camera.
Now, we'll need to make sure the box is the right height. To change views, press [Ctrl]+[Tab]. Change views until YZ Side is displayed in the upper left corner of the main window. To make it taller, left click above the long side on the top and drag the mouse upward. Drag it until the top line is on 128, then bring the bottom to 0 if it isn't already.
We have just created a brush, which is a solid object in Jedi Outcast
(and most other modern 3d games). But to actually have a level, you have
to hollow out the brush. Otherwise the level would be unplayable; you
have to have an empty space bounded by solids to run around in. To
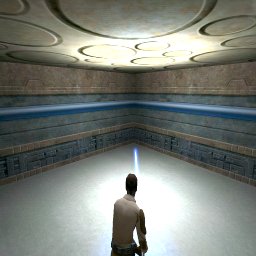
hollow the brush, hit the hollow button on the button bar.  Now your map (hopefully) looks like this:
Now that it's hollowed, deselect it by pressing [Esc].
Let's texture this baby up. For this you won't need the main editing window, so lets focus on the 3d preview. Navigating in the 3d preview is fairly simple. The arrow keys move you around, [A] and [Z] look up and down, while [D] and [C] move you up and down.
If you not inside your room, move inside it using the controls stated above. Select the floor by holding [Shift]+[Ctrl] and left clicking on it. It should turn reddish. We need to load a texture set to choose textures from. In the Textures menu, click bespin. The textures may take a while to load; be patient.]
The Texture Browser should be right below the 3d preview. You can scroll through the textures and pick your own, or you can type in the box floor and select the first texture that appears. Your floor surface should be now textured.
You can also select a group of brushes to texture at one time. Click in the 3d preview, then hit [Esc] to deselect the floor. Hold [Shift] and click each of your rooms foor walls. Once again, you may pick your own texture, or type in mp_b_wall04a and select that texture. Your walls should all be textured and (hopefully) aligned correctly.
Deselect your walls ([Esc], remember?) and select the cieling. Texture it using your own texture, or ceiling01. Your room should be completely textured. But what good are textures if you cant see them in game? You need a light!
In the main editing window, click somewhere in the middle of your room. From the large menu that comes up, select "light".
Switch to other views ([Ctrl]+[Tab]) and move your light into the center of the room by clicking it and dragging. You just created a light, so you can see your beautiful level. But what good is that if you can't actually get in your room? You need a player_start!
Deselect your light ([Esc]), and once again, right click in your room, and from the menu, choose info>info_player_start. Look in other views and make sure that he is completely inside your level and a little bit above the floor. If your player is not above the floor, he will fall through the floor, which is not a good thing.
Now your level has everything it needs. Save your level (File>Save As), and save it in Jedi Outcast\GameData\Base\Maps. This is extremely important if you want to be able to play your level. After you have saved, go to Bsp>Fullvis.
A command window will pop up and do some stuff... it may take a while. This is a compiler, which converts your level into information Jedi Outcast can use to run a level. After it's done (it will say Finished in the title bar), close that window and exit Jk2Radiant. You're ready to test your level!
Load the Jedi Outcast Single Player program. After you're in the interface, bring up the console by pressing [Shift]+[`]. In case you don't know, the [`] key is right above [Tab]. Type in devmap [maptitle], where [maptitle] is the name of your level. For example, my map is called MyMap.map, so I would type devmap MyMap without the *.map extension. Your level will load, if you did everything right.
Now that are are somewhat familiar with how JK2Radiant works, you can use tutorials made for Quake3 Radiant and apply them to Jedi Outcast. Have fun!