Coloured Lighting in MotS
Author: Antony Espindola
This Editing tutorial covers how to create coloured lighting effects in Mysteries of the Sith using the JED editor - how they work and how to implement them into your level.
Creating coloured lighting is no harder than creating normal lighting. If you haven't done any lighting yet then this shouldn't be a problem as lighting in JED is quite an easy thing to do but a very hard thing to get perfect! It is worth taking the time to keep refining the lights in your level until you are happy with it.
It's a good tip to also get your lighting checked on both a 3D Card system as well as using the software mode. There can be great differences between the two and refining the lighting to give the best compromise will give a better overall impression with players using both systems.
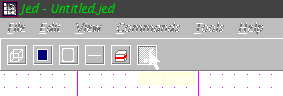
We'll start with the basics of creating a light in a room in JED. To insert a new light on your map, select the Light Mode button from the toolbar or by pressing the L key.
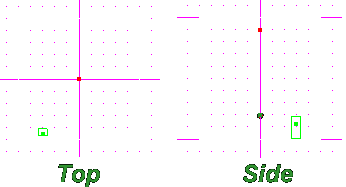
Now you are in Light Mode, we can insert a new light or edit an existing light. Place the arrow over where you want your light to appear. I always find it easier to do this in the Top-Down View (SHIFT-1) of JED. Press the INSERT key and your light will appear! Now you have placed your light, switch to a Side View (SHIFT-2 will do) and make sure that the light is high enough up for the purpose. Obviously, if you are creating ground-level lights, then you want the light to be near the floor. Note that it is not a good idea to place a light directly on a surface. This may give some strange results, so move the light to just in front/above/below it instead.
In addition to my coloured light which I want to just light the ceiling, I've also added a plain white light which will light the rest of the room. To do this, I've put the light in the middle of the room like this:
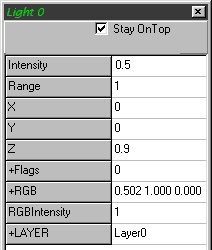
Now we have created our light and it's in the right place, we'll take a look at the properties for lights. Click on your light and press ENTER to make the property window appear (if it isn't there already).
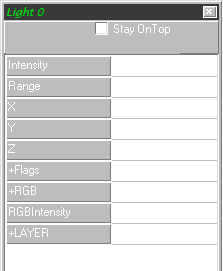
As with normal lights, you will only need to change the folloning:
- Intensity - ranges from 0 (no light) to 1 (fully lit).
Negative values are also acceptable as they can be used to darken surfaces. If you are creating a purely coloured light, set this value as low as possible, usually to about 0.3 or lower, depending on the RGB Intensity you are using. If you set this value any higher, the white light it produces "overrides" the coloured light and it won't show in your level even though it may look correct in the 3D preview. - Range - this is in JKU's but the light delay is quadratic.
Confused? This means that the intensity of the light will be a quarter of the value at half the Range, eg. if your light's intensity is set at 1 and the range is 10, then at 5 JKUs away the light will be at 0.25 intensity.
This is an important point to remember when setting the range value of your lighting. - RGB - This defines the colour of the light. In Jedi Knight, all lighting is white but Mysteries of the Sith allows you to create fabulous coloured lighting (hence the point of this tutorial!). Double-click on this box to get the familiar colour-picker. You can either select some predefined values, select a colour from the chart, or type in the values yourself.
- RGB Intensity - This defines the intensity of your coloured light. Again, this works in the same way as the normal light intensity but applies to the colour. You could therefore have an RGB of pure blue, but no RGB intensity and so your light wouldn't show as blue! Always make the RGB Intensity greater than the normal Intensity of the light, otherwise it won't work correctly.
- Flags - The only Flag used in lighting is "Not Blocked". This means that the light is not blocked by impassable surfaces. Normally you would not need to set this flag unless you wanted to create light which passed through surfaces, which might look odd!
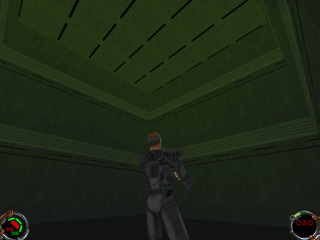
So let's create a nice green light which will show up on the ceiling in our room. As this is a tutorial, I've created a square room for my light to be in. DON'T DO THIS IN YOUR LEVEL! Square rooms suck! Cleave the top, sides or corners to make it more interesting!
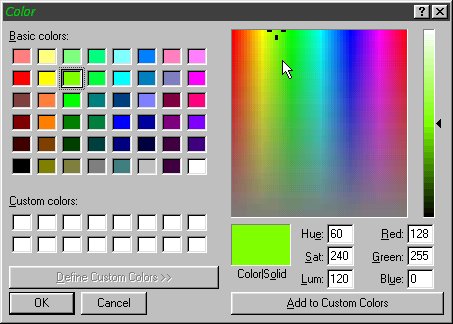
Double-click on the RGB section of the Light's properties and pick a suitable green colour. I've chosen the really green colour here as I want it to really stand out. You'll need to experiment with various levels, colours and so on until you're happy.
Now I'll set the RGB Intensity to 1 so it will be at full brightness at the position of the light. Notice that I've set the normal Intensity to 0.5 to stop it overriding the coloured light.
Now set the Range of the light to 1. As my room is 1 JKU square, this means that the light should have faded right out by the time it reaches the edges. It'll help demonstrate how the lights work. If I wanted to fully light the room I could increased the range of the light to spread it out more.
Now you've created your light, you need to calculate the lighting. Pick the Calculate Lighting option from the Tools menu. This will calculate the lighting in your level. Now you can save your level and GOB it too. Select "Save JKL and GOB Project" from the file menu.
Now you need to run Mysteries of the Sith and look at your level. Cool! Coloured lights!
Experiment with coloured lighting and try to add it into your level in appropriate places.
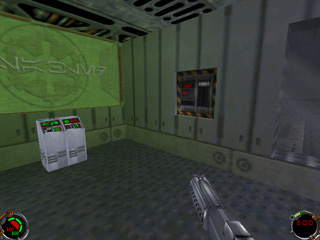
I've added a green glowing colour around the "View Panels" in my level!
Imperial Satellite Outpost by Antony Espindola