Perfect Pipes & Polygons
Author: aDames Lombardi (JM)
There's one thing I've been struggling with since I began editing... The universal question... the bane of editors everywhere... five simple words... HOW DID THEY DO IT??!!
Who's they? Why, LEC of course! In level two of Jedi Knight you travel through a big air vent system - every pipe is perfect. They curve without their original shape getting stretched out, or enlarged, or any of that. I've always wanted to know how they did it. Then Brian wrote his Perfect Polygons tutorial, and it popped into my head. I suggest you go read that tutorial first, because you won't be able to complete this one unless you understand at least most of it. I also suggest that you know how to use the F9 tool in JED.
In the Perfect Polygons tutorial, it has you take a sector, rotate it around into a solid circle, with the interior points making 360 degrees. Then it has you cleave a bit, and you have your perfect polygon. Unfortunately, it only works for 8, 16, and 32 sided figures, right? Wrong! If all the interior points must total 360 degrees, then each interior angle must be equal to the 360 divided by the total number of interior angles. How many interior angles? One for each side! Let's break that down one more time. To complete a circular polygon (not a perfect circle, just a circular polygon), the interior angles must equal 360. 360 is the number of degrees in a circle.
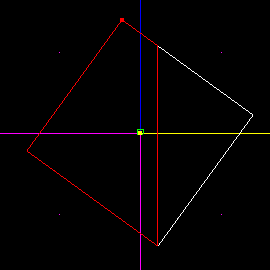
To make the perfect starting triangle for a ten sided figure, I would first divide 360 by ten, and get 36. 36 is the number of degrees each inside angle will be. So, take the default sector and rotate it 36 degrees. To do that, just press F9, set the rotate axis to Z, enter 36 into the degree box, and press rotate. Now, align the grid to the vertex pointing downward, and cleave vertically. See in the picture below.
You now have two sectors. One is the one you want, the other isn't. If you started with the default sector, you want the one on the right. If you didn't, you can quickly find out. If the final number of sides in your polygon will be 5 or greater, you want the smaller one. If it's four, you're wasting your time using this technique, and if its 3, you want the large one.
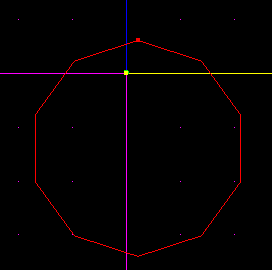
Now, using Brian's technique for rotating and cleaving, create your perfect polygon. There's no reason to change the rotate degrees in the tool window. Remember, for more information on this, refer to the Perfect Polygons tutorial.
Okay, so you have the perfect polygon, what next? Why, the perfect pipe! I'm just going to create a doughnut shape with ten sections. These things can be hard to texture, so be prepared. When deciding on the number of sections you will use, be a bit careful. For 45 or 90 degree angle turns, it is best to use numbers divisible by 4. This will help with the math later. Also, in the math below, if you pick a different number, and your division results in numbers that continue on forever (like 2.3333333333, etc), you must choose a different number or it won't work. If this is confusing, don't worry, just follow the rest of the tutorial.
First off, you must decide what angle you are going to do. In this case, our angles will all equal 360 since we are going in a loop. If, however, you are just wanting to go 90 degrees, it is a little different. All you have to do is take the number of degrees your turn will go (in our case 360) and divide it by the number of sections you are going to use to turn it. Since we decided above that we are going to use 10 sections, we get 360 / 10 = 36. If you are only making a 90 degree turn, you would only want to use say 4 sections, so you would use 90 / 4 = 22.5.
This is a little confusing, but just bear with it. To review: take the angle you are planning to turn and divide that number by the number of sections you are going to use to go that angle. If you are going 90 degrees, you could use 4 sections, or 8 - 8 will be more detailed, but would take longer. It doesn't matter as long as you do the math right.
Now take that number, and divide it by two. If we are going 360 degrees, we figured 360 / 10 sections = 36. Take 36 and divide it by 2, and you get the correct angle for rotating the sector. So 36 / 2 = 18. Take the sector you have, and rotate it 18 degrees. Note that if you are going 90 degrees with 4 sections, the math would work out like this: 90 / 4 = 22.5. 22.5 / 2 = 11.25. So you would rotate it 11.25 degrees.
Now select the top vertex, snap the grid to it, move back to sector mode, and cleave straight down. This ensures that you get the correct angle. See you rotate it by the angle you want, and cleave straight down. We only do this so we are sure to get exact angles. If you didn't rotate and cleave vertically, you couldn't get the correct angle.
Sometimes you don't have enough room to cleave correctly. If this happens, you will just have to extend the sector. Just grab one of the end surfaces and drag it out. Note that this won't work quite so smoothly if your sector is at an angle, so the easiest thing to do is to make sure it's long enough before you start.
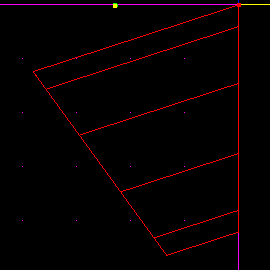
Reference the picture below on how to cleave.

Delete the extra sector. Now, rotate the remaining sector by NEGATIVE the number you found earlier, back to its original position. So, since we rotated it by 18 degrees, we will now rotate it by -18 degrees. Then do that once more, so it tilts the other direction. Cleave it vertically again.
Now you have a sector with two identical angles on each side. This ensures that you can rotate the pipes and end up with matching surfaces. If you had different angles, they wouldn't line up, and you wouldn't be able to adjoin them.
Be sure to leave some space on the inside edge of the sector. This ensures that when you stick them together, they don't make a point. It wouldn't look much like a pipe if there was a point sticking out. See the picture.
Now that you have this sector, you copy it [Insert], then rotate it by the correct number of degrees to line up with the old sector. To get the correct angle, just take 360 divided by the number of sections you are using. So in our case, we take 360 / 10 and get 36.
So, we rotate the sector by 36, and move it into place. Use the [Insert] key once again, rotate the new sector by 36, and position it correctly. When you do that enough times, your sectors will line up and make a doughnut. If you are making a 90 degree turn, you won't have to insert as many new sectors. Just remember how many sections you planned on using.
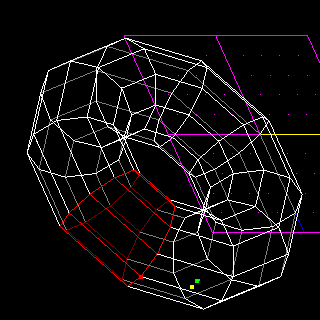
Now you have a nice perfect, undistorted curve. See the picture below.
There is something I would like to go over once again to emphasize the point. Some numbers of sides just can't be done, such as 7. When you divide 360 by 7, the number is a repeating decimal, and JED won't let you stick it in the rotate box. No multiples of seven will work either. 11 doesn't work. 13 doesn't work. There are a few other numbers that also won't work. A general rule is that if you have to stick more than three decimal places in the degree box, don't use it.
Aren't you just so happy that you can make perfectly curving pipes now?!