Note: This is an old page that has been updated/formatted, you can view the original here.
Skins
Author: CosmoDNA
Let's take a look at how to make your own skins for Jedi Knight. Like all tutorials, it's pretty easy. ;)
These are the files you'll be working with:
- .BMP: The graphics file you'll be editing.
- .MAT: JK uses these, they're essentially just a converted form of bmp.
- .3DO: This tells JK how your character is put together, including a list of mats.
- Models.dat: This is the multiplayer character list file. In order to use your skin, it must be added to this file.
- Jk.pal and Jk.cmp: This is the palette JK uses for most skins. Same palette, two different files. You'll need them both.
These are the programs you'll be using:
- WordPad: Comes with Windows, just a text editor. Used for viewing 3do and dat files.
- Matedit: Use this to convert mats to bmps.
- Paint Shop Pro: Use this to create your bmps. This is the best shareware paint program out there. DO NOT use Microsoft Paint; the bmps made with this don't work with JK.
- MatMaster: Use this to convert bmps to mats.
How Mats Work, More or Less
Mats are two dimensional images slapped onto a three dimensional frame. The skins you're used to seeing in the game are most likely going to look quite different in mat format, because they're flat. It's a good idea to examine the 3do you want to work with in the Multiplayer section of JK. As you get better at this, you'll learn how certain mats are applied to the 3do (not everything you draw on your bmp will be visible once it's applied to the actual body part... just keep experimenting until it works).
For this tutorial, we will be using Yun's 3do. Since he's one of the only guys that doesn't have a shoulder pad of some sort, he makes a pretty standard humanoid form (apparently you can get shoulder pads for next to nothing in the Star Wars universe... everyone has the things).
-
Finding and Extracting Mats
Once you have a 3do in mind (in this case, Yun), you'll have to extract it from the Res2.gob in the Resource folder of your JK directory. First, extract models.dat from the "misc" section of Res2.gob, using Conman. Open it up in Wordpad and find the name of the 3do you want to use. For Yun, it's kya18.3do, so find that in the "3do" section of Res2.gob and extract it.
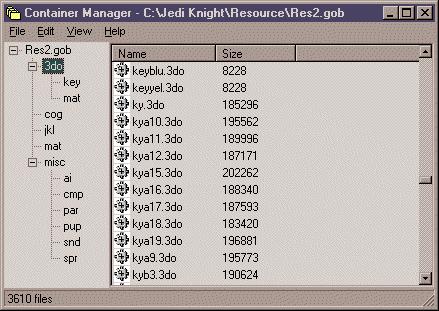
NOTE: It's advised that anything you extract you should copy and put in a resources folder for later use, so you don't have to extract them again. You should also make a folder for your new mats, bmps and whatnot.
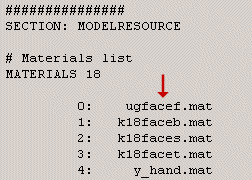
Now, open kya18.3do in Wordpad. At the top, you'll see this:
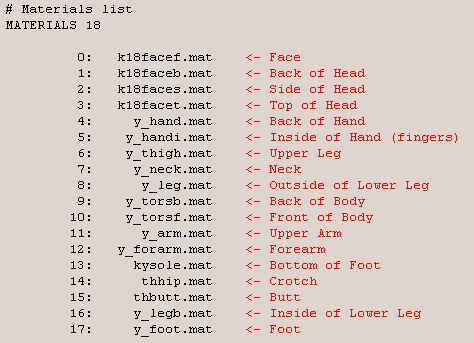
This is a list of mats used for Yun's 3do. You can find all of these in the 3do/mat section of Res2.gob. We'll just be messing with Yun's pretty face, so find and extract k18facef.mat.
You'll find that not all 3dos use the same amount of mats, or body parts. Yun, for example, has two mats for his lower leg, while most 3dos only have one. Another example is Cybot, he only has two mats for his head, which doesn't make for flexible skin making.
-
Mat to Bmp
Use MatEdit to open k18facef.mat. Now you'll see Yun's face, in all it's flat glory. Next, save it as a bmp file (make sure you pick ".BMP" at the bottom of the Save As window) in your skins directory. Let's call it "ugfacef.bmp", for reasons I'll explain later. We're all ready to make your new face!
-
The "Art"
Open up ugfacef.bmp file in Paint Shop Pro. You will once again see Yun's face.
IMPORTANT: As soon as you open up your bmp, go to Load Palette in the Color menu and load up jk.pal from wherever it is on your computer. This guarantees that you'll be using the right colors
Okay! Let's go!
Oops. Wait. First there's something else you should know. About the palette.
-
3A The Palette
The jk.pal file is a palette of 256 colors. However, you might not want to use some of them:
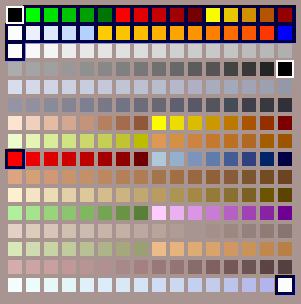
Black (0.0.0) (in the white boxes): Pure black comes out transparent in Jedi Knight. This was used for those see-through grates that the Jedi Knight folks love to use so much. So unless you want your guy to have holes in him, don't use black! Although, some folks have used black to do some pretty nifty effects (missing limbs, etc.)
"Light" Colors (in the black boxes): The top two rows are generally "light" colors. That is, they're used for mats with lights on them, and theoretically, they'll glow in the dark. With my computer, the light effect only works in non-3d mode. In 3d mode, they're as dark as the rest of the colors, so I'm not entirely certain how this works. Use these colors with care. (This also includes the first red in Row Nine (252.0.0) and the last white in the Last Row (252.252.252.)
The bottom four rows of the palette are also tricky. If the colormap of the level you're playing is set to the dflt.cmp palette, they're going to come out funky, with glowing pink and purple pixels everywhere. It's an ongoing mystery in the Jedi Knight community as to how this works so, once again, take care with these colors.
So what does that leave you? Not a heck of a lot, but with a little imagination and patience, you can make some fun things happen.
-
3B. The "Art" Again
Okay, let's make Yun's face look different. You can do virtually anything, from adding a scar, changing the tint, or creating a whole new face, which is what we'll do here. One thing you'll want to remember, and this borders on some of that Art Theory junk. After Colors, Blending is the most important aspect of making a mat that no one will laugh at.
Blending simply means using as many shades of a color between the lightest shade and darkest. Huh? Well, take a look at this:
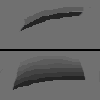
The top image uses just one shade of grey between the darkest shade and the lightest (the background.) Now look at the bottom. It uses many shades, making a more subtle effect. It's just a matter of drawing several differently-colored lines next to each other. The jk.pal palette is grouped in order of shading, so you'll be able to find the colors you need more easily.
Like I said, we're going give Yun a facelift. Make note of is where everything on Yun's face is located, mainly the nose and brow. You'll want to try to roughly line your new face's features up with Yun's, since if you put the nose higher up, lower, or get rid of it altogether, the 3do model still has a big fat nose sticking out. Here's a breakdown of what we'll be doing:
- Once again, Yun's face. I've talked about this way to much, so...
- Obliterate Yun's face. That's right, using the Shapes tool (Rectangle/Filled settings), just block out everything. Use a lighter color, the color you imagine to be the basic skin tone for your character.
- Using a much darker color (five or six shades down the scale) and the Paint tool, paint a basic shape for your face. This is where taking note of where Yun's features are comes in handy.
- Now, the blending. Starting from that dark color, pick the next lightest color and paint along the dark lines. Some folks recommend picking every second color, so just mess around and see what you like. Repeat with the next few lighter colors up the scale.
- The details. I added amazingly goofy looking eyes, and some highlighting with a much lighter color that my basic skin tone color from Step 2. This is to simulate a vague light reflection off his skin.
So now we have a finished face, kind of. He still looks cartoony and pixelated, kinda ugly. So how do we get the quality of this face to be on par with Yun's? I mean aside from having LucasArts pay us to do it?
-
3C. Blur
Alright, first off, save your bmp, just to be safe. You can name it anything you want, of course, but if you name the bmp the same as what you want your final mat to be named, it makes using MatMaster that much quicker.
Now, in the Color menu, pick Increase Color Depth | 16 Million Colors. You'll see the image doesn't really change. Next, go to the Image menu and pick Blur | Gaussian Blur.
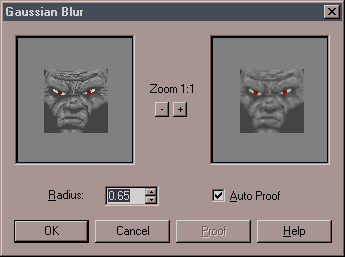
Set the Radius to about .50 - .65 or so. You'll see the blurred image of your face in the right window. If it looks a little too blurred, don't worry, this isn't how it's going to end up. We're using this to blend the colors that much more to ensure that everything's all nice and mixed up. If you look close up at any of the mats in JK, wether for a character or just a wall, you'll usually see bunches of mixed colored pixels. In moderation, this can make for some nice realistic textures.
NOTE: Because of the way JK put mats onto a 3do, the mats on the front of your skin will come out backwards. That is to say, a scar over the right eye of your face in bmp mode will come out over the left eye in the game. I don't know why this is, but if it concerns you, you can use the Mirror function in the Image menu. This will flip your face the right way.
Done with that? Click OK, and you'll see your face is now all blurred. Now, ONCE AGAIN, load up jk.pal from the Color menu, and voila! Our face is now back to normal, albeit really stupid looking, but that's my fault. Except it'll be a little more blended.

Keep in mind that this takes some experimenting to get it right. If you have, say, a really bright green pixel right next to a really dark gray pixel, after blurring and loading jk.pal, the green area will probably look pretty muddy with lots of random colors. This is because there are only so many colors to choose from, and the computer tries to find some nice transition colors, but sometimes fails miserably.
Okay! Just save your final product and we'll mosey onto the next step...
-
-
Bmp to Mat
Open up MatMaster, and pick "Compile MTM to MAT" (don't worry about the wording of this, we're using it to convert a bmp.) Enter these values:
- Input File Name: Browse (little folder button with the red arrow on the right) and find your bmp, in this case ugfacef.bmp ("ug" stands for "ugly" because that's what my example bmp is.)
- Palette From File: Browse and find jk.cmp.
- Output File Name: You can just leave alone, it'll create ugfacef.mat in the same directory that ugfacef.bmp is located.
- Hit the Convert button and your mat will be created!
-
3DO Editing
Open up kya18.3do in Wordpad. The Materials List will be at the top, and all we have to do is change the name of Yun's face mat to our face mat:
Then save the file, renaming it something different than ky18a.3do, let's say "ugly.3do" (and put the .3do extention in with the name.) Make sure you select Text Only when you save, or else it won't come out right!
That was simple editing. If you change more than one mat, make sure you're replacing the right filenames in your 3do, or else you might end up with your guy's face on his leg or something.
-
Multiplayer
This is where we let Jedi Knight know to show your 3do in a Multiplayer game. Remember, if you want your new skin to be seen by others, they must have a copy of the skin.
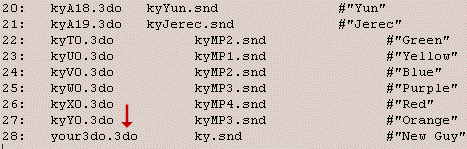
Open models.dat in Wordpad. You'll see a list of 3dos, snd files and names of characters. The snd files contain information on what sounds each character will use in the game. Go down to the bottom of the page, copy the last line (should be line 27), and paste that at the bottom. Change the "27" to "28", and change the name of the 3do to "ugly.3do". You can also change the name to the right, but this is for informational purposes only, it doesn't affect the game.
Keep in mind that when you go to the Multiplayer Character picker in JK, it'll list your skin as whatever the 3do is named. In this case, it'll be listed as "UGLY". So you might want to make the 3do have a name that's somewhat descriptive of the character. Numbers and abbreviations aren't pretty.
Finally, go to the top of the file and change the numModels to "29". If you don't change this, JK won't know there's one more 3do at the bottom of the list.
-
Putting It to Work
Alright, final step. Go to the Resource directory of your Jedi Knight directory. Create three new folders in the Resource directory and name them (all in lower case):
- 3do
- mat
- misc
Now, move ugly.3do to the 3do folder, ugfacef.mat to the mat folder, and your new models.dat to the misc folder. You should now be all set to test your new skin out! Start up JK, pick Multiplayer | Multiplayer Characters and go down the list until you come to our pal UGLY.
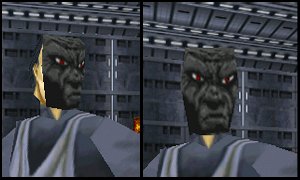
In the game, you'll find that regardless of how hideous a mat might look on your flat screen, it'll look a little better in JK, due to the way the engine uses colors and whatnot. Except with my skin...it looks pretty ridiculous, kinda like Yun's going out for Halloween...
And that's it! If the colors come out all screwy, just make sure you used all the right steps. You must remember to have jk.pal applied to your bmp before you save it, and keep those six rows of dicey colors we talked about earlier in mind.
Sharing It With the World
There are two steps to preparing your skin for uploading:
Gob it: Get a copy of JK Gob. Copy the 3do, mat and misc folders from your JK Resource directory to a new directory. Use JK Gob to put them into a gob file.
Zip it: Using Winzip or some other zipping program, zip it up (with a text file describing your skin) and you're done! Upload it to your favorite JK board, and bask if your newfound fame as the World's Best Skinner!*
*results may vary