Preparing Your Jedi Outcast Map for Release
Author: Pommy
This tutorial will guide you through readying your just-completed map for public release and/or submission to Massassi.
Sections:
- Adding the finishing touches to your map
- Adding your map name to the map loading screen
- Creating a levelshot
- Creating an .arena file
- Pk3'ing your level up
- Creating the pk3
- Knowing what files to add in your pk3
- Sending it to Massassi (optional)
- Adding a readme
- Adding screenshots
- Making the zip file
Adding the finishing touches to your map
When you have compiled and tested your map to your satisfaction, it is ready to make it professional and official. Be sure your map name has its according game type in front, i.e. if it's Free for all ffa_sample or Capture the Flag, ctf_sample. First, you have to make sure your map name shows up on the loading screen.
Let's say your map bsp file is called ffa_sample.bsp. You don't want the loading screen to say ffa_sample.bsp, you want it to say "Sample Map". To do this, open your map using JK2 Radiant or GTK Radiant (preferred), and press "n". This will bring up the entity window. Scroll down to where it says "worldspawn". There, enter the key "message" and the value "Sample Map". (Replace "Sample Map" with whatever your map name is.)
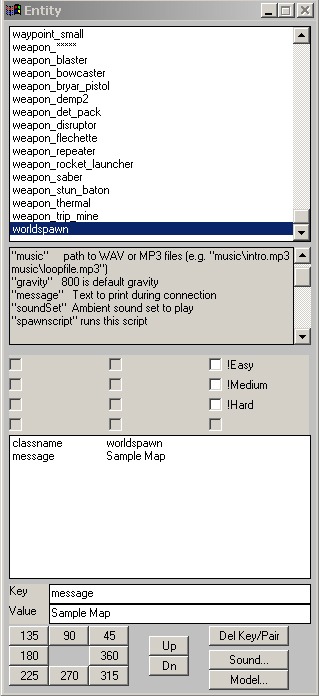
Add the message and the key value
The next objective is to make a levelshot for your level; that is, a picture to display in the background when the map is loading in place of a black screen. To do this, start the game, bring up the console, type "g_gametype 0", then "devmap ffa_sample", and join the spectators. Bring up the console and type "bind f12 levelshot" (or another key, if f12 is taken). Navigate to the location where you want the levelshot to be, and press f12 when you are ready to take the shot. BE SURE YOU ARE IN THE RIGHT POSITION BECAUSE ONCE YOU TAKE THE LEVELSHOT THE MAP WILL RESTART, AND IF YOU ARE UNSATISFIED YOU WILL HAVE TO DO IT AGAIN. Take note of what the levelshot file is called, it should be written in the upper-left corner. The levelshot will be saved in your gamedata/base/levelshots folder.
Now, it's time to make the .arena file. Use your favorite text editor (Notepad is suggested), and create a new document. Don't save it yet. Let's say that your map name is ffa_sample.bsp. Write this, exactly as written here, in your document:
 {
  map           "ffa_sample"
  bots          "Luke"
  longname      "Sample Map"
  fraglimit     "30"
  type          "ffa team_ffa"
 }
Let's break this down:
- map: this is the name of your bsp.
- bots: what bots you want to have if the minimum players is set to 2 and no bots are specified by the player.
- longname: the same name you set for the loading screen.
- fraglimit: the default kill limit.
- type: gametypes you want your map to be played in. If more than one, put a space between each type.
Save the file as ffa_sample.arena.
Pk3'ing your map up
Fire up your favorite Archive Manager (I prefer WinZip). Create a new zip file. Place your bsp in a folder called "maps". Place the arena file in a folder called "scripts". Finally, place your tga (levelshot) in a folder called "levelshots". Put all 3 folders in your new zip file. Save the zip. Then, navigate to the location where you saved the zip (say you named it ffa_sample.zip) and rename it ffa_sample.pk3.
Sending it to Massassi (optional)
If you would like to submit your level to the Massassi Temple (www.massassi.net), or if you plan to distribute it in any way, you should zip your file and add a readme and screenshots. To zip your file, simply repeat the instructions with the pk3, except only add the pk3 to the zip and don't rename it. You will need a readme so your file is legal. A sample readme can be obtained here, at the Massassi Temple. Add your readme to your zip file. Next, you need screenshots. Start up your game and enter your level. Bring up the console and type bind f11 screenshot, as you did with your levelshot. Go around your level and take 2 screenshots that depict your level. Add those to your zip, they will be found in your gamedata/base/screenshots directory.
Finally, if you are sending to Massassi, you will need to follow it's specific submission guidelines. These guidelines can be found at https://www.massassi.net/submit.
Well, if you've done all that, your map is ready to go. Good luck on distributing it, and congratulations!