Keys
Author: PJB
- What is a key?
- What do I need to make one?
- How do I make one?
- Now that I have my key, what do I do?
- Let's play!
1. What is a key?
For those of you asking this question, a key refers a .key file, such as KYJUMP.KEY, it lends animation to objects in the game. This is not the same as an enemy moving around a level, no no. A key is responsible for the movement of the body, for example, while jumping, shooting, running, walking, etc. This applies to basically any movement an object makes in the game.
2. What do I need to make one?
To make a key you will need a program called Puppet Jedi (or PJedi), created by the Code Alliance. You can get this from the Massassi Temple's Programs Downloads page. It's a very small program (v0.7 is 290k) and it only takes a moment to extract with something like WinZip.
3. How do I make one?
Puppet Jedi may seem very complicated at first, but you will soon find it very easy to use. It makes MS Paint look difficult! Start by putting your Jedi Knight game disc in your CD drive, then click File, then Open, then navigate to 3DO/KY.3do. When you open it, you will be presented with this!
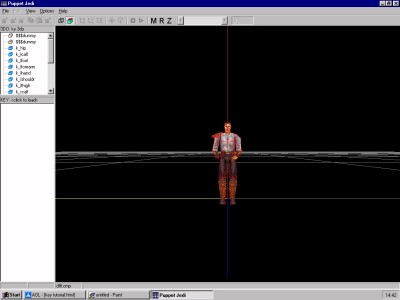 gulp Looks complicated, doesn't it?
Don't worry, it's easy! Now, we can either edit an existing key (example: to make Kyle fall apart when he jumps, HE HE HE), or make a new key (example: to make Kyle have some new move or make a cloned version of Kyle move slightly differently). In this tutorial we are going for the second option: make a new key (it's the best way to learn!).
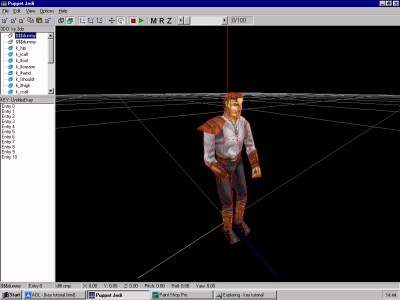
First we need to rotate Kyle so we can see him properly. We could just go to View > Offset View in the menu, but that would be to easy. In the toolbar at the top, you can see three buttons, 'M', 'R', and 'Z'. Those stand for Move, Rotate, and Zoom. If you click on one, then click in the space around the model while dragging the mouse, the model will move (or you will move around it, whatever you want to believe).
Move around a bit, get used to the movements, and then position the model like this.
Now we can start to work. Click File > New Key and you'll get this:
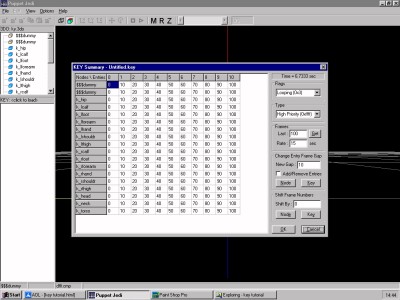
screams Lots of horrid numbers!
LOL don't worry it's all quite straightforward. Those numbers indicate the number of single frames. A frame is like a single picture, like the 'frame' of a movie. The numbers at the top are the 'Key Frames'; each one is set at an increment of frames from the last. You edit the key frames and all the frames in-between are filled in for you. All this is on its default at the moment, so you can just click OK and continue. As your skills develop you will learn to use this window to make your keys more finely tuned.
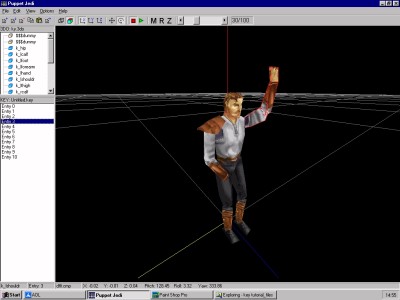
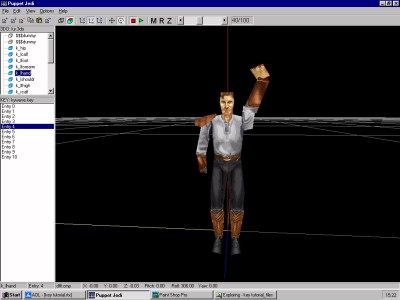
Now we are at the same screen as before. Select one of the parts of Kyle in the little box at the top left of the screen. Today we are going to make Kyle wave (which we could use to make him wave goodbye to Jan in a level!).
Select K_lsholdr. A list of entries will appear in the box just below. Select Entry 1.
There are two ways to edit a frame: you can double-click the entry and enter a position by typing in the X, Y, Z, X rot, Y rot, and Z rot positions manually, but that leads to an odd bug where all the frames are not entirely filled in. The second method is to move the parts using the mouse. This is the easiest way, and the most intuitive, so that's what we will be doing.
The buttons we want are these:  . The first is the X
position, the second the Y, the third the Z. The next two buttons are
very important. the first is to move the part, the second is to
rotate the part. Check to see that the first and the last are
selected, (like in the picture below), then click and drag Kyle's arm
until it looks like this:
. The first is the X
position, the second the Y, the third the Z. The next two buttons are
very important. the first is to move the part, the second is to
rotate the part. Check to see that the first and the last are
selected, (like in the picture below), then click and drag Kyle's arm
until it looks like this:
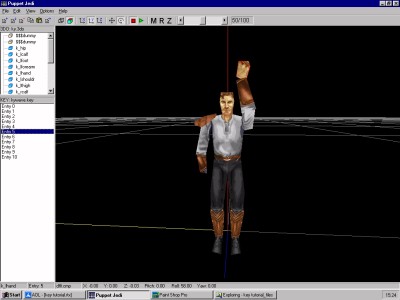
Okay, here's the interesting part: right-click on Frame 3 and select Copy, then click on the next frame, right-click and select Paste... repeat the pasting for all the other entries for the arm.
In the top left-hand box select k_lforarm and select Entry 4.
Now, remember the buttons from before? Well click on the
Y button to move Kyle's forearm to the right, then choose the next entry
and move his forearm to the left. Repeat this with all the remaining
entries; move Kyle's forearm left and right so it looks like he is
waving.
You see the big green button and the big red button on the toolbar? These are the Play and Stop buttons. Before we use them, let's save the .KEY file. Go to File > Save Key (I saved mine as Kywave.key). Now play the key by pressing the green button. It looks alright, but when did we go with "alright"? He looks like Michael Jackson doing The Robot! It's too solid.
What you should do now is take your hands of your keyboard and mouse and wave your hand at the screen. See how your hand kind of flops, or sways with the momentum of your arm? Well, we want to do that with our friend Kyle here!
Select K_lhand and Entry 4. Move his hand so it's facing in, bent in the opposite direction of his wave, like this:
Then on Entry 5 move it the opposite way, like this:
Repeat this with all the other entries for his hand, then play it back. It looks a little more life-like now, doesn't it?
Those are the basics for a wave. You can, of course, go into more detail. For instance, you should make his torso move very slightly and make his arm move a little more fluidly, because at the moment his arm looks quite dumb. You want to take time making it look more real. Of course, if you were making a robot you might want it to look very static anyway, but spending some time and energy on a key file can produce some really good results. I have included the completed key file for you to compare. You can have a look at it here.
4. Now that I have my key, what do I do?
If you were creating an enemy, you would want to make a PUP file (that's the topic for another tutorial I will be creating later). If you open up one of the PUP files in RES2.Gob, like Kyle's, you will discover that they are also very simple, that you could replace one of Kyle's keys with this new one, so when he fired a weapon he would wave instead. There are lots of things in JK you can do with keys: you can make ships land and open its landing gear, get an actor to do stuff, and of course make new enemies. In Mysteries of the Sith you can go one step further and create new movements for the in-game cutscenes.
5. Let's play!
Now that you have your new keys get in there and make some cool levels for them to shine. Play around: just because something is the norm doesn't mean it's the best! See what you can do and all I ask is that you credit me in your work. Now get out there and have some fun!