Character Model Import Tutorial - 3
Author: Michael Frost
Model Setup
I won't be telling you how to make a model. If you are at this point in the tutorial you should have something ready to go... I suggest looking for tutorials at www.3dcafe.com and www.polycount.com to get you going on this matter. I will simply give pointers to how to best set up a model for the Jedi Outcast engine.
Tips for Model Setup
You should allow enough segmentation for both animation, and for dismemberment.
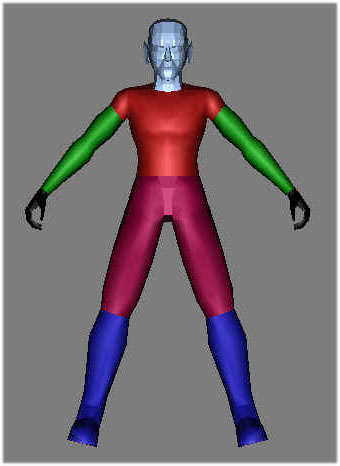
These are simply guidelines for how I try to set up a model for JK2 -- Jedi Outcast to allow the model to animate properly with the skeletal setup.
The colored areas show how I have my models generally broken down, for proper dismemberment:
|
 |
Animation
Face
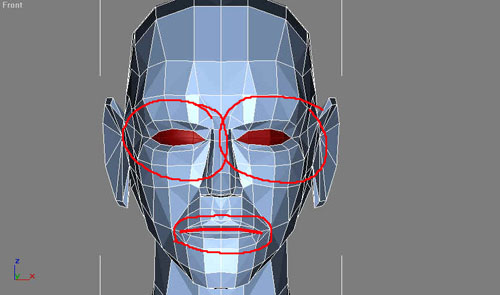
You should have the mouth split at the point where the lips meet, and if you want make it so that there is a mouth cavity behind the lips, and teeth, so when your model opens its mouth, you don't see through the back of its head!
For eyes, model them separate from the eyelids as round spheres, then cut the back half of those eyes off. Line up your eyelids with the eye pieces and you wont have too much to worry about for when they animate.
Arm
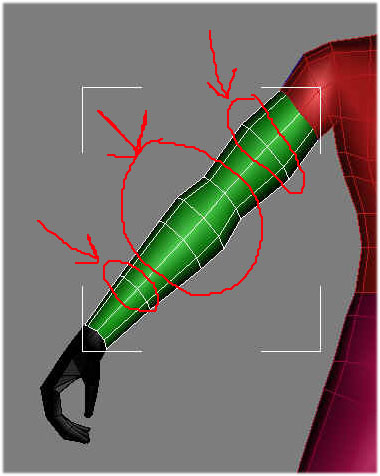
Bicep and Forearm should have one segment, and 2 to 3 segments for the elbow
Thigh
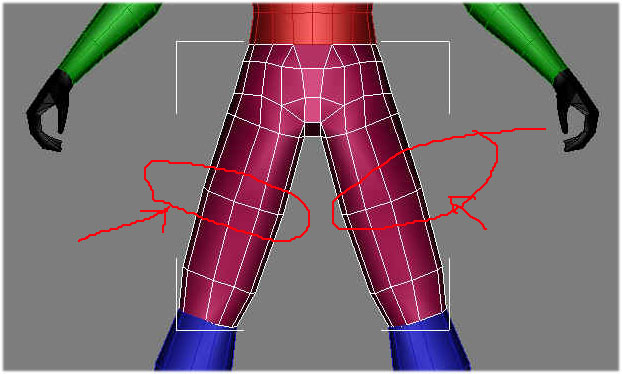
I have one segment setup for the thigh, in the middle. At the hips, it is best to have an extra segment in there for animating from the hips and crotch area to avoid stretching parts that shouldn't be stretched...
For the knee, I usually have 2 to 3 segments -- one above the joint, one below, and one in the middle of it, like the elbow
And those are the only main guidelines you should try to follow for model creation. If you don't care about dismemberment don't worry about breaking your model up, however it gives the model a bit more polish especially for those lightsaber battles!
Model Naming Procedures
Aside from the Skeleton, which already has a naming scheme set up for it, the character model requires a specific naming setup or else things such as dismemberment will not work properly. The names are all fairly self-explanatory, they refer to what body part they are.
- Hips
- Torso
- Head
- R_Arm
- L_Arm
- R_Hand
- L_Hand
- R_Leg
- L_Leg
Those are the key names -- R_Whatever and L_Whatever of course stand for Right and Left. The corresponding mesh parts should be named as such.
Naming Caps
Caps, now, for dismemberment, must be named accordingly
- Torso_cap_head_off
- Head_cap_torso_off
- R_arm_cap_torso_off
The _"off" gives the indicator to hide the model piece until dismembered. The cap designated to be on the stumps of the torso, for example, would start with Torso_cap -- and it would end with whichever part would go on the opposite end. So, a cap for the torso at the stump of the neck would be named Torso_cap_Head_off.
Alternate Parts
Should you happen to have any extra item that is attached to a specific body part -- IE. Armor, a belt, a vest, and such -- and are modeled separate, and you would like to be able to produce the model in-game either with or without that model part, create it as a separate model, and have a prefix on the Name that contains the name of the model part it is attached to, or linked to. This method also helps to keep things clear when selecting the parts or otherwise.
For example, with Exar Kun, I created a separate cape, as well as armor, for the character. The armor -- one piece for each shoulder -- was named R_Arm_Pauldron. The shoulder armor was linked to the R_arm, the cape was Torso_Cape, and it was linked to the torso.
Get the idea?
Linking the Pieces
Okay, so you now have a model named appropriately and are ready to go for linking, then skeletal setup. You should also link the appropriate pieces to their correct part, leading up to whichever part you call "Hips".
i.e., Head -> Torso -> Hips
To do this you must use the link tool in Max:
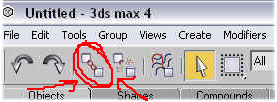
Have the piece you want to link to its parent selected, click on the Link tool as shown in the picture, then drag from the piece to its parent. It will link it to the model.
For the arms, go R_hand link to R_arm, R_arm to Torso, and so on and so forth.
For caps, have the piece that is supposed to cover the hole on the end of the limb linking to its limb... i.e., R_arm_cap_r_hand_off links to R_arm, Torso_cap_head_off links to torso, and so on.
In the end, when we get the skeleton included, you should link the bolts to hips which works, then link hips to Stupidtriangle_off bolt. Any additional parts, such as, say, goggles which would be a separate model yet attached to the head, would be linked to the Head model piece.
To see what is linked and what is not, double click the model piece you named Hips and move it -- all parts should move by the end of linking, save for the skeleton.
Textures
The textures can be in BMP, TGA or JPG format -- if in TGA, it supports alpha channels, primarily useful for shaders. For JPEG images, make sure you save in baseline standard format within Adobe photoshop -- other formats seem to get weird results in JK 2, for me at least... whatever works for you, great.
You can compile your parts into a single texture, or do them over multiple small textures for different parts (face, torso, arms, legs, etc). It is better practice IMO to put them onto one or a few textures, not quite as many as they used as in JK2, but hell, today's hardware can handle a lot worse than this.
Model Icon Images
One thing to note is that you should create 256x256 JPG files for your model, one fore each .Skin file, named icon_default.jpg, icon_blue.jpg, and icon_red.jpg for the Default, Blue, and Red textures of your model, so that they show up in the in-game selection menus. These files will go in the custom model folder with your GLM file and textures as well.