Character Model Import Tutorial - 4
Author: Michael Frost
Getting a Skeleton!
Here we will create a file to act as a basic template for our 3D model, using the Jedi Knight base skeleton. I have also included my own skeleton file with this tutorial, called "Skeleton_weighted.max" for you to see what the end result is.
Open up 3D Studio Max.
Go to File → Import
Navigate to the folder C:\base\models\players\kyle\, or wherever you have the models from the Jedi Knight 2 Editing Tools
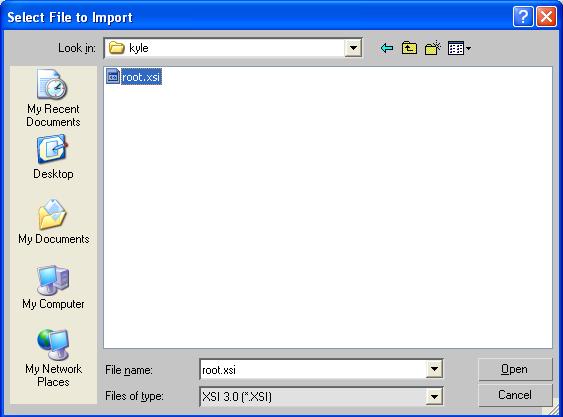
Change the "Files of Type" rollout to XSI (*.XSI) type
Select the Root.XSI file, and click Open --
You will see this box:
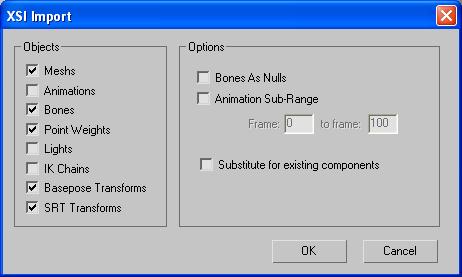
Under the XSI Import box, uncheck the "Animations" Check-box, as shown, and leave everything else as default.
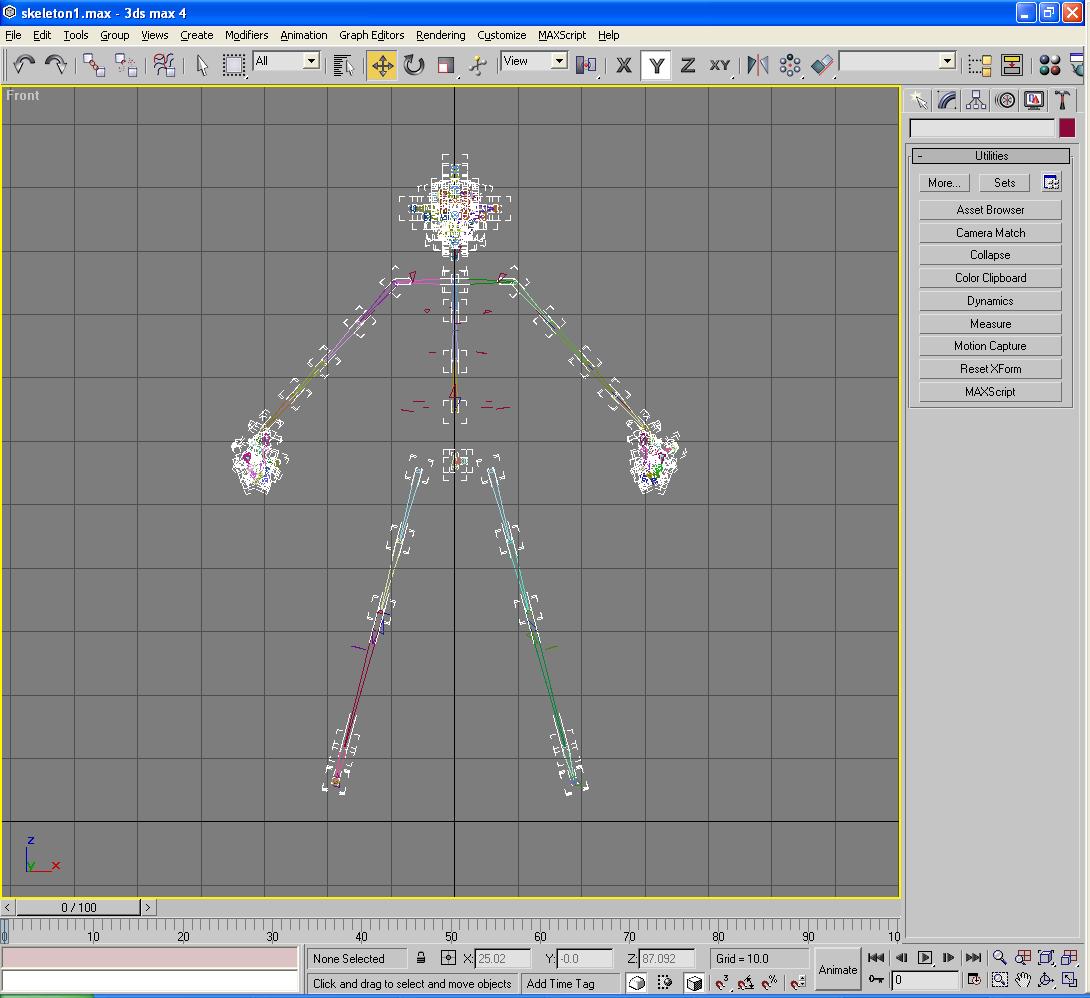
You will now see this appear in your viewport: (image 2.13)
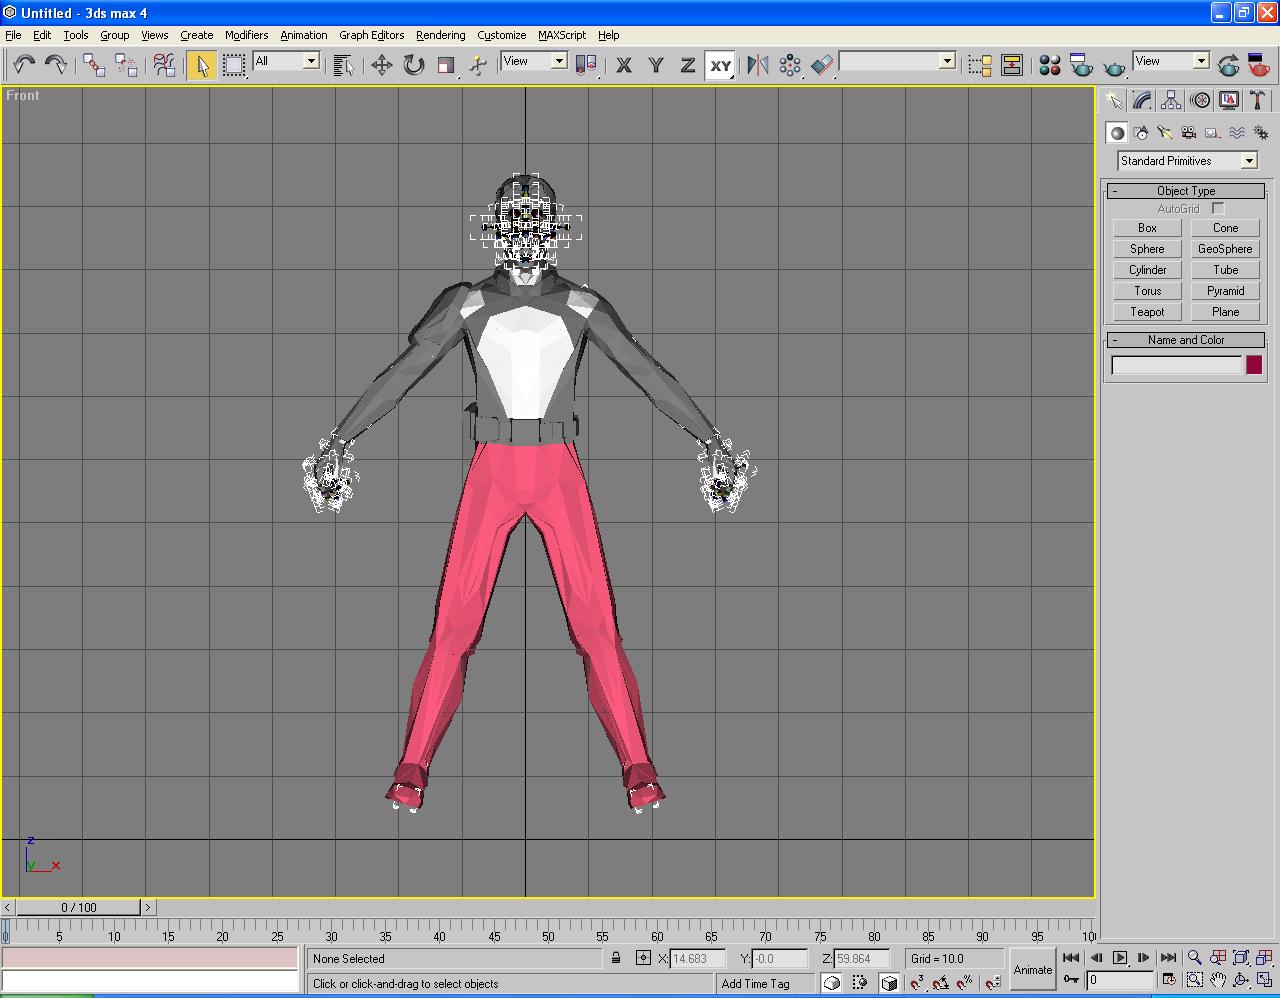
(image 2.13 Kyle's Root.XSI file, imported)
This is the full Kyle Katarn model, with the 3 Level of Detail models included in the viewport. Don't worry, I will explain about the Level of Detail (L.O.D) models further on in this tutorial, for those who don't know what I am talking about.
You will now have to select all parts of the model, except for the skeleton, and delete them part by part, leaving behind only the main bolt parts, and the skeleton.
The easiest method I find is to first do this:
First, find the object known as "Stupidtriangle_off_1", and select it.
(You can use the "H" key to go to the item select window to find out exactly where it is.) (see image 2.14)
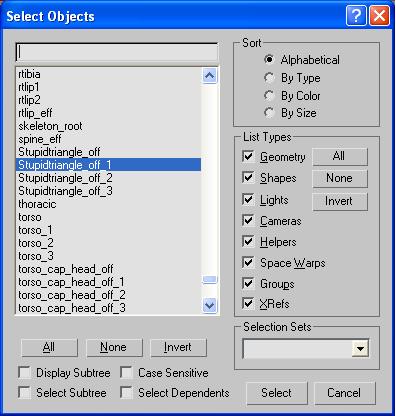
(image 2.14 -- 3d studio Select Objects Rollout)
Once you have found this triangle, select it, and move it either horizontally or vertically away from the main mesh layout. (image 2.15)
(image 2.15 -- 3d studio Select Objects Rollout)
You see, it moves the whole mesh that is linked to it -- Stupidtriangle_off bolts are essentially the top of the heirarchy chain for the JK2 model system, meaning everything roots back into it through linking. I will explain more about how to set this up on your model later. For now, lets move on.
Double-click Stupidtriangle_off_1 -- this should select all of the first LOD model. You do not need this mesh at all for the skeleton, so hit Delete.
Now, repeat these steps for the second and third LOD models, via the Stupidtriangle_off_2 and Stupidtriangle_off_3 bolts.
This will leave you with a single mesh -- this model will not have any parts with a _1, _2, or _3 extension.
Next Step:
You will have to begin deleting the model bit by bit -- do not delete any of the bolts and such, nor the skeletal parts. Start with Hips, and move on from there.
*IMPORTANT NOTE:
There are two items between the skeleton's feet, Mesh_Root and Model_Root.
DO NOT DELETE THEM!
Those are required for the skeleton to work in-game.
Do not forget the caps at the end of the limbs and such. You will end up with a viewport looking like this (image 2.16)
(image 2.16 -- Results after removing Kyle model, leaving behind framework)
Now, we must weight the Bolts to the skeleton.
This will be the first exposure now to the Skin modifier within 3D Studio Max 4 -- you will have to apply a Skin modifier to each individual Bolt (Bolts are the red triangles shown in the viewport, separate from the skeleton.) (image 2.17)
(image 2.17 -- Red objects: Model Bolts)
and link it to the corresponding skeleton part.
For example, click on the "bolt_shldr_r", near the right shoulder of the skeleton.
You may also use the "H" select button to choose this item as well, as it is named bolt_shldr_r. (image 2.18)
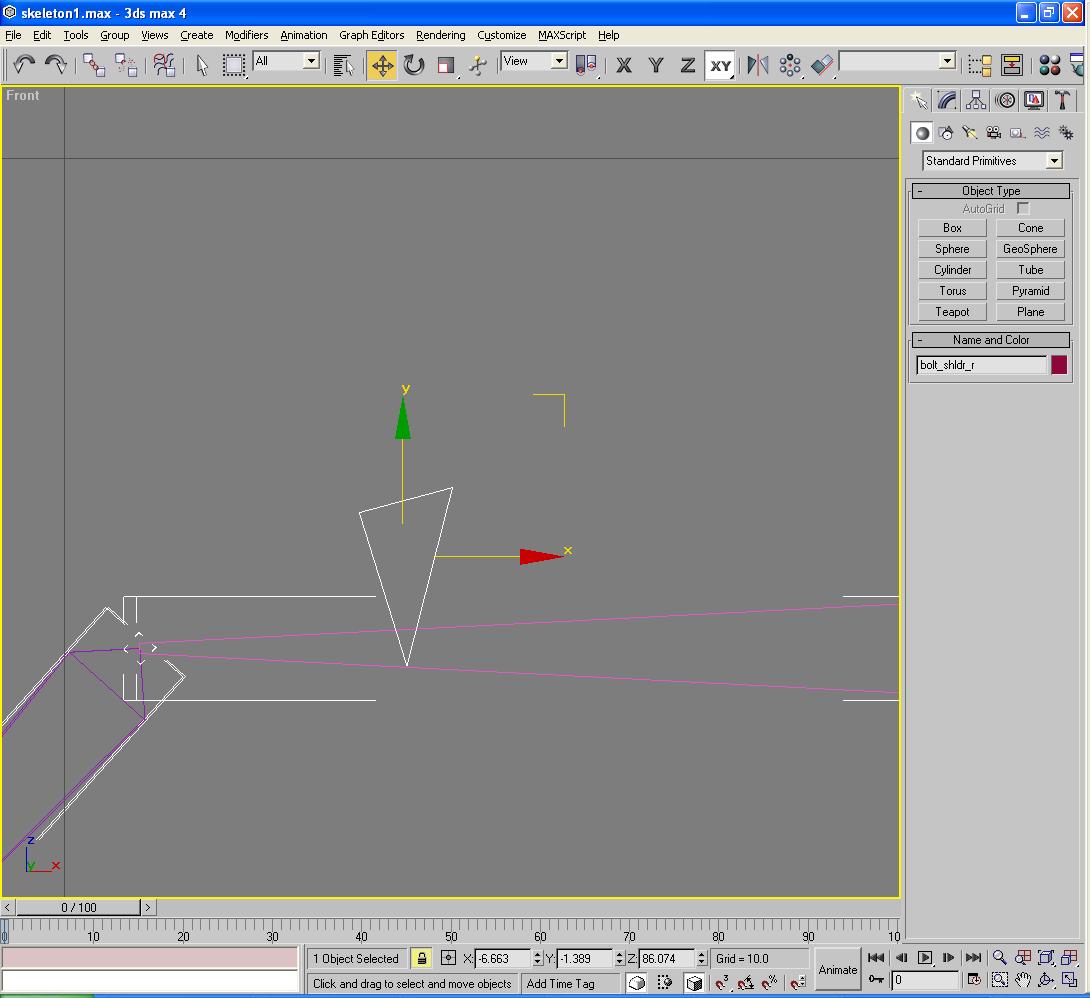
(image 2.18 -- Bolt_shldr_r, Selected)
Click on the Modify tab. (image 2.19)
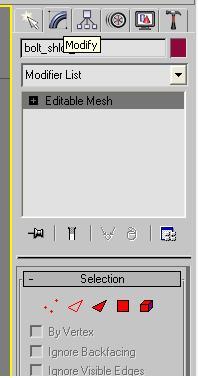
(image 2.19 -- 3d Studio's Modify list)
Click on the Modifier List rollout, and under the Animations Modifier, you will find "Skin" (image 2.20)
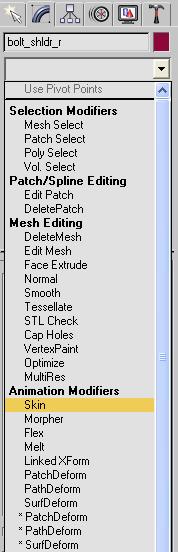
(image 2.20 -- Skin Modifier's location)
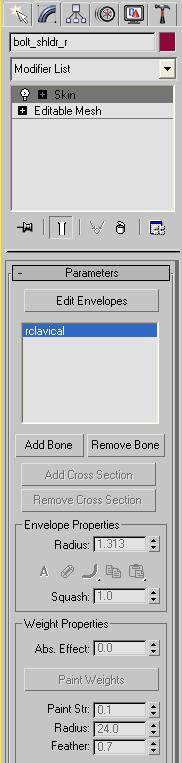
The Skin Modifier layout looks like this:
(image 2.22)
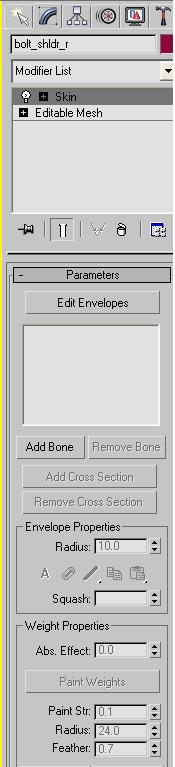
(image 2.22 - Skin Modifier Panel)
Click on the "Add Bone" button located in this panel. This will bring up the "Select Bones" window. (see image 2.23)
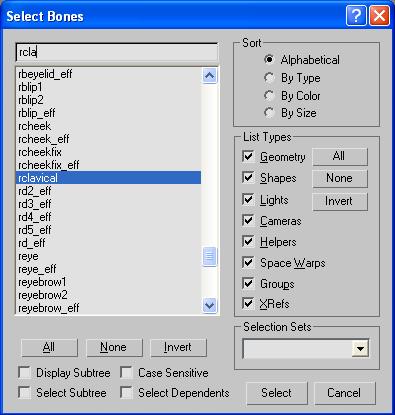
(image 2.23 -- Select Bones Window)
The corresponding bone for this model is "rclavical" (as shown in image 2.24 -- white highlighted bone with transparent box around it) so you want to select it in the "Select Bones" selection window, and then click the "Select" button in the lower right hand corner of the window.
Now, the Modifier Panel should look like this: (image 2.24)
(image 2.24 -- Skin modifier panel, with the "rclavical" bone added)
You will now see that "rclavical" is listed in the window above "Add Bone".
You want to now click on the "Edit Envelopes" button (image 2.25)
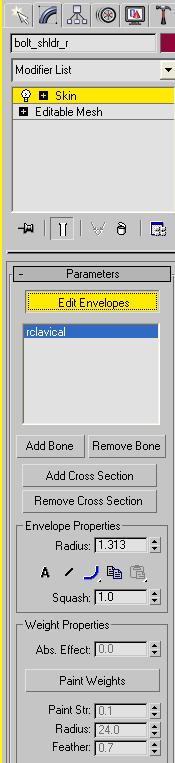
(image 2.25 -- Skin modifier panel, Edit Envelopes activated)
Now, click on the "Paint Weights" button, below, under "Weight Properties" (image 2.26)
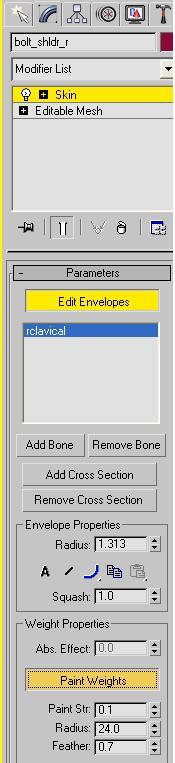
(image 2.26 -- Paint Weights Selected)
For now, don't worry about Paint Str, Radius, or Feather, I will try to explain those later to what I know.
With "Paint Weights" clicked on, go back into the main viewport, and scroll your mouse over top of bolt_shldr_r, and you will see two yellow lines at about a 45 degree angle, parallel to each other. (see image 2.27)
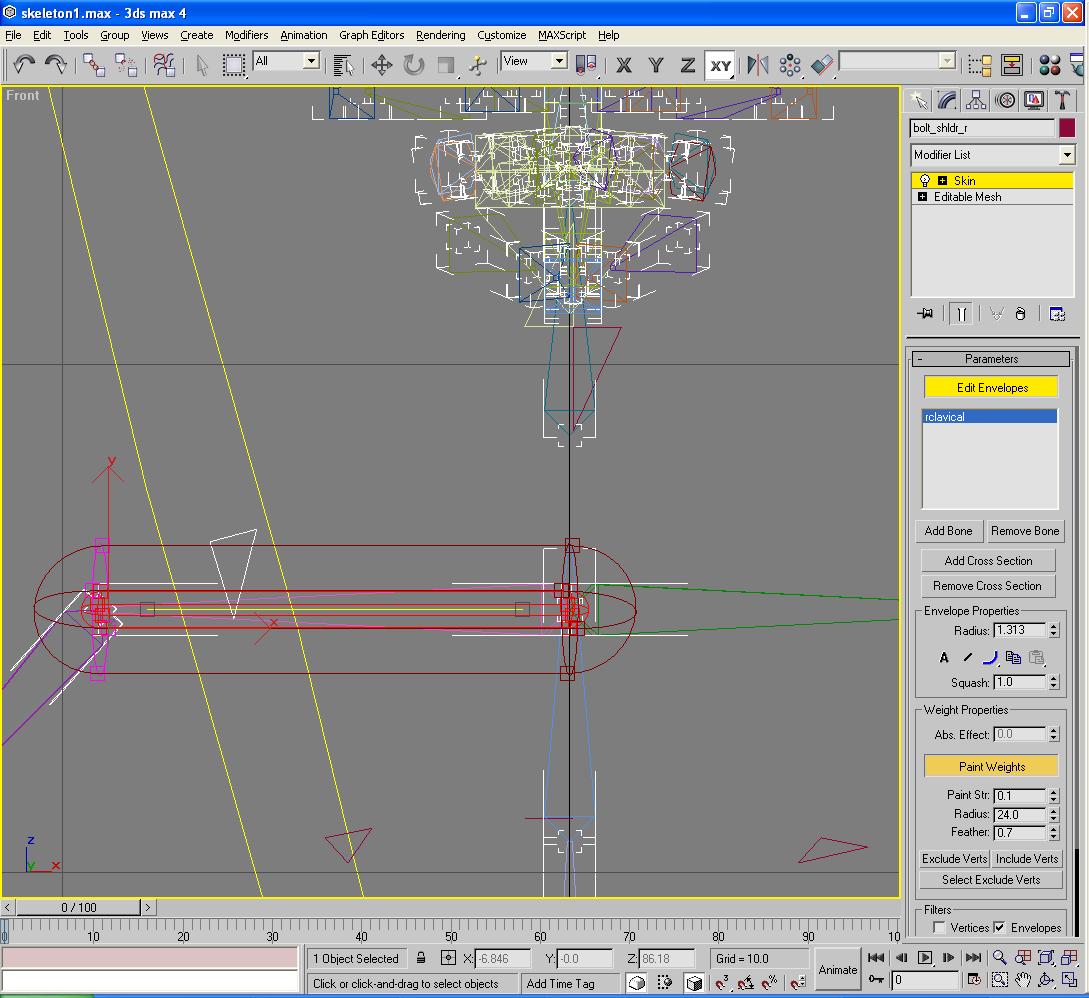
(image 2.27 -- Paint Weights cursor)
Those yellow lines are the extents of the "Paint Weights" function -- it is for assigning vertices from a model to be linked to the selected bone. If you change that number within the Radius box underneath the "Paint Weights" button, it will shrink or enlarge this yellow frame/cursor.
Currently, since we only have one bone selected, weighting is simple -- just scroll your mouse over the Bolt, and left-click your mouse once.
You will see the bolt now have a red dot at the end of each corner on the bolt/triangle -- (see image 2.28)

(image 2.28 -- Skin modifier, weighted vertices on the bolt)
This means those vertices are now weighted to the "rclavical" bone.
To now de-select "Bolt_shldr_r" since we are finished with it, click on the Yellow- Lit Up "Edit Envelopes" button, and click on another mesh piece.
Congratulations, you have weighted one bolt! Now just 40 or so others and we're done.
You will have to follow these steps for each bolt on the model. I will not repeat everything I have just said here; instead, I will indicate which parts should be weighted to which bone in the following list, starting from the legs up.
BOLT BONE
Bolt_r_leg_foot → rtalus
Bolt_l_leg_foot → ltalus
Bolt_r_leg_calf → rtibia
Bolt_r_leg_cap_hips → rtibia
Bolt_hips_cap_r_leg → rtibia
Bolt_hips_r_knee → rtibia
Bolt_l_leg_calf → ltibia
Bolt_l_leg_cap_hips → ltibia
Bolt_hips_cap_l_leg → ltibia
Bolt_hips_l_knee → ltibia
Bolt_hips_r → pelvis
Bolt_hips_l → pelvis
Bolt_hips_br → pelvis
Bolt_hips_bl → pelvis
Bolt_hips_fr → pelvis
Bolt_hips_fl → pelvis
Bolt_lchest_r → upper_lumbar
Bolt_lchest_l → upper_lumbar
Bolt_uchest_r → upper_lumbar
Bolt_uchest_l → upper_lumbar
Bolt_back → upper_lumbar
Bolt_chestg → upper_lumbar
Stupidtriangle_off → upper_lumbar
Bolt_shldr_r → rclavical
Bolt_torso_cap_r_arm → rhumerus
Bolt_r_arm_cap_torso → rhumerus
Bolt_r_arm_elbow → rradius
Bolt_r_arm_cap_r_hand → rradiusx
Bolt_r_hand_cap_r_arm → rradiusx
*Bolt_r_hand → rhang_tag_bone
*NOTE : IMPORTANT
This bone MUST be bound to the "rhang_tag_bone" bone or else the saber will not animate properly ingame. You may have noticed this on early versions of Darth Vader, or Jango Fett.
Bolt_shldr_l → lclavical
Bolt_torso_cap_l_arm → lhumerus
Bolt_l_arm_cap_torso → lhumerus
Bolt_l_arm_elbow → lradius
Bolt_l_arm_cap_l_hand → lradiusx
Bolt_l_hand_cap_l_arm → lradiusx
Bolt_l_hand → lhand
Bolt_torso_cap_head → cervical
Bolt_head_cap_torso → cervical
Bolt_head_left → cranium
Bolt_head_right → cranium
Bolt_head_front → cranium
Bolt_head_back → cranium
Bolt_head_top → cranium
Bolt_head_eyes → cranium
And those are the general weightings that should be done for each bolt part.
In order to check what is now weighted, find the bone called "pelvis", and double-click it.
Attempt to move it sideways on the screen. If there is (are) a(any) bolt(s) not moving, identify which one it was, undo any movements you had made to the skeleton, and weigh the necessary parts.
Again, to test if anything was left un-weighed, click on the pelvis bone, and try moving it. This also works when weighting your full, finished model.
Be sure to save your skeleton when you are finished with this, as you will need it once you are ready to import your model in-game.